7 Surprising Arduino Uno Specifications You Can't Ignore and Obstacle-Avoiding Cars: Roadmap to a Safer World
Discover the 7 surprising Arduino Uno specifications that can elevate your projects and learn how these insights contribute to the development of obstacle-avoiding cars, making our roads safer. Dive into this essential guide and unlock the potential of your Arduino Uno for innovative solutions!

Table of Contents
This is important in robotics, especially for autonomous vehicles which we require to navigate on their own. The application commonly found in this domain is the Arduino uno specifications based obstacle avoiding car that detects obstacles with ultrasonic sensors and avoids it using servo motors. The ease of which they are able to explore environments without collisions, these cars are perfect for tasks such as surveillance or remote monitoring. Although this project uses the Arduino Uno, the car can be made from a Arduino Nano based on size requirements and power availability.
Project Overview
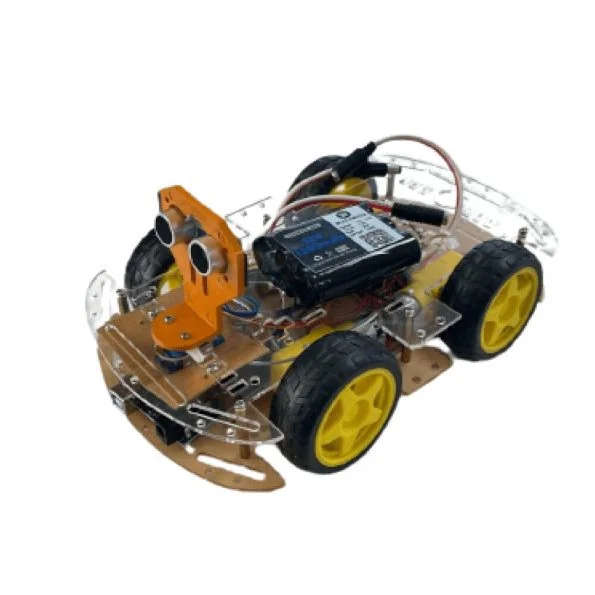
In this detailed tutorial on how to build an obstacle avoiding car using an Arduino Uno! Arduino Cost Our car is smarter at avoiding obstacles as we use a servo mounted ultrasonic sensor and thus can detect the obstacles not only in the front but also on sides simultaneously. An L298N DC motor driver will allow the four geared motors hooked to the wheels to be powered by this car as well. The frame and assembly of the car for this guide requires the use of a standard Arduino car kit.
Arduino Uno: Specifications
Ok, before we start digging into it, let’s take a look at the Arduino Uno specs that make it perfect for this project. The Arduino Uno comes equipped with:
- 6 PWM outputs (from 14 digital I/O pins).
- 6 Analog Inputs,
- A clock speed of 16 MHz,
- 32 KB Flash memory to store (code)
- An ATmega328P microcontroller powered it.
This means the Arduino Uno is powerful enough to track multiple inputs and outputs at once, something that is necessary for receiving signals from sensors, motors, LED’s, etc. in this obstacle avoiding car project.
Components Required
- To get started, you will need the following components:
- You will need Arduino Uno or Arduino Nano (What you prefer).
- 1x MG90 Metal Gear Servo Motor
- HC-SR04 Ultrasonic Sensor,
- RGB LEDs (3x),
- L298N Motor Driver,
- Laser cut chassis 2WD Arduino Car Kit.
- 12V Li-ion Battery,
- LM2596 DC-DC Buck Converter,
- Switch,
- Jumper Wires,
- Breadboard or PCB,
- Screws, Nuts, and Spacers.
- Working Principle of the Car
- The HC-SR04 Ultrasonic Sensor is the heart of the obstacle-avoiding car. How This Sensor Works: It emits ultrasonic sound waves at 40 kHz. If these waves hit an obstacle, they bounce back and the sensor will notice them. The Arduino works out how far away the car is from the obstacle by measuring how long it takes for the echo to come back. The Arduino turns the motors one way or another depending on the readings.
BUILDING Obstacle Avoiding Car
Step 1: Assembling the Car Kit
To build the body of your robot, you can use any off the shelf robotic car kit. These kits generally include a chassis, wheels, together with a mounting bracket for the electronic components. For this project, we've picked a more car like kit with front bumper, spoilers, etc. Projects such as a Human Following Robot and Pick and Place Arduino Robot Car used similar kits for your interest.
Step 2: Circuit Diagram
You need a carefully planned circuit for the project. An ultrasonic sensor is mounted on a servo motor such that directional measurements are allowed. The sensor sweeps from side to side, detecting objects ahead of and to the side of the car.
Servo Motor Connection
To connect the servo motor, plug the signal of the servo motor to any PWM pin on the Arduino Uno. The first being that you connect the power wire to the 5V output from the DC-DC converter and the ground wire to one of the Arduino’s GND pins.
Ultrasonic Sensor Connection
Then connect sensor VCC pin to 5V pin on Arduino, GND pin to ground and TRIG to digital pin 2 and ECHO to digital pin 4. By this point, the ultrasonic sensor is connected to the Arduino, so it can read distance from the sensor and process the data.
RGB LEDs Connection
Threading the RGB LED cathode (ground) of each of the LEDs to a common ground rail on the breadboard. Then connect A1, A2, and A3 to the LED’s red terminal, and digital pins 5, 6, and 13 to the green terminal. The advantage of this configuration is you can have the Arduino control the color of the RGB LEDs as you need.
L298N Motor Driver Connection
The L298N motor driver is what lets us control the motor of the car. Connect the breadboard’s positive rail to Arduino’s Vin and the breadboard’s ground rail to Arduino’s ground. Second, connect the 5V output from the LM2596 to the positive rail and the LM2596 ground to the ground rail. L298N’s IN1 and IN2 for the first motor needs to be connected to Arduino pins 7 and 8. Now to connect to the second motor, connect IN3 and IN4 to pins 12 and 11. Lastely connect L298N’s ENA and ENB pins to the Arduino PWM pins 9 and 10, enabling the independent control of each motor.
Power Connections
The positive terminal from 12V Li-ion battery is connected to the LM2596’s Vin input and negative terminal is connected to the ground rail of breadboard. Connect the battery’s positive terminal to L298N motor driver’s 12V input and the battery’s negative terminal to L298N’s ground pin as well.
Additional Enhancements
Additional features you could add, in order to improve the car's design, include a power switch, a DC charging socket and a Li-ion battery level indicator. Coming from the back of the car is this indicator, featuring a slider switch that allows you to check the battery status without the need to power on the whole system. When you charge the battery, the switch goes into the 'up' position.
Arduino Uno Specifications: Why The Project Is Perfect for It?
In this project, Arduino Uno is a popular choice with its easy to use ATmega328P microcontroller and an easy to configure pin. Its specifications include:
Input voltage rang of 7–12V, operating voltage of 5V.
Enough flash memory to hold multiple lines of code, 32 KB, is provided.
We have 6 analog inputs with 10 bits of resolution which is ideal for reading sensor data,
14 digital I/O pins of which 6 can provide PWM output to control motors and LEDs.
A 16 MHz clock speed for responsible sensor data processing.
Final Steps and Precautions
Screw, nut and spacer all components to the car frame. Secure all connections so that short circuits do not occur. First, before powering on the circuit, double check the connection and you will confirm that it’s arduino power switch off.
Conclusion and Code
After you have made your Arduino based obstacle avoiding car, upload the code to the Arduino Uno. Here the HC-SR04 sensor is set up to find distances and output signals to the motor pins according to those distances. You can customize the code based on your needs, e.g. modify the threshold distance and adjust the speed control of the motor.
For this project, the Arduino Uno’s specifications are perfect, as it has a number of features available that make it more versatile with connection and controls. Now that everything is in order, your obstacle avoiding car is equipped to explore autonomously, without bumping into obstacles!
include
This block includes the Servo library, which is necessary for controlling the servo motor.
// Ultrasonic sensor pins
define trig 2
define echo 4
// RGB led pins
define LR 9 // Led Right
define LC 13 // Led Center
define LL 10 // Led Left
define LRR A3 // Led Right Red
define LCR A2 // Led Center Red
define LLR A1 // Led Left Red
In this block, various pin constants are defined for components such as the Ultrasonic sensor and RGB LEDs. These constants are used to specify which pins on the Arduino are connected to each component.
// Motor control pins
define LEFT_MOTOR_PIN1 8
define LEFT_MOTOR_PIN2 7
define RIGHT_MOTOR_PIN1 12
define RIGHT_MOTOR_PIN2 11
define ENA 6 // Enable A pin for motor speed control
define ENB 3 // Enable B pin for motor speed control
// Distance thresholds for obstacle detection
define MIN_DISTANCE_BACK 12
This block defines threshold values. MIN_DISTANCE_BACK represents the minimum distance required from an obstacle to stop.
void setup() {
// Set motor control pins as outputs
pinMode(LEFT_MOTOR_PIN1, OUTPUT);
pinMode(LEFT_MOTOR_PIN2, OUTPUT);
pinMode(RIGHT_MOTOR_PIN1, OUTPUT);
pinMode(RIGHT_MOTOR_PIN2, OUTPUT);
pinMode(ENA, OUTPUT);
pinMode(ENB, OUTPUT);
pinMode(LR, OUTPUT);
pinMode(LC, OUTPUT);
pinMode(LL, OUTPUT);
pinMode(LRR, OUTPUT);
pinMode(LCR, OUTPUT);
pinMode(LLR, OUTPUT);
digitalWrite(LR, LOW);
digitalWrite(LC, LOW);
digitalWrite(LL, LOW);
analogWrite(LRR, 0);
analogWrite(LCR, 0);
analogWrite(LLR, 0);
servoLook.attach(5);
//Set the Trig pins as output pins
pinMode(trig, OUTPUT);
//Set the Echo pins as input pins
pinMode(echo, INPUT);
analogWrite(ENA, 53.5); // speed for motor A 0-LOW speed, 255-Full speed
analogWrite(ENB, 45); // speed for motor B
// Initialize the serial communication for debugging
Serial.begin(9600);
}
In the setup() function, various initializations take place. This includes configuring motor control pins, LED pins, and sensor pins as either OUTPUT or INPUT. It also sets the initial states for LEDs and RGB LEDs to LOW or 0. Additionally, the Servo motor is attached to pin 5, motor speed is adjusted using analogWrite() for ENA and ENB, and serial communication is initiated for debugging (though this part is optional).
void loop()
{
servoLook.write(90);
delay(750);
int distance = getDistance();
if (distance >= MIN_DISTANCE_BACK)
{
moveForward();
Serial.println("forward"); }
while(distance >= MIN_DISTANCE_BACK)
{
distance = getDistance();
delay(50);
}
Stop();
int turnDir = checkDirection();
Serial.println(turnDir);
switch(turnDir)
{
case 0: //Turn left
Serial.println("Left");
turnLeft();
delay(425);
Stop();
break;
case 2: //Turn right
Serial.println("Right");
turnRight();
delay(415);
Stop();
break;
case 3: //move forward
Serial.println("Forward");
moveForward();
break;
}
}
These lines define digital pins of Arduino (pin7,pin8,pin12 and pin11) for the L298N motor driver inputs to control the DC motors. The pins in1 and in2 control one motor, and the pins in3 and in4 control the other motor. Ena and Enb control the speed of the motor.
This is the main loop of the code, executed continuously. The servo motor is set to look straight ahead, and there's a delay for it to settle. The getDistance() function is used to measure the distance using the Ultrasonic sensor. If the measured distance is greater than or equal to MIN_DISTANCE_BACK, the robot is instructed to move forward. While the distance is above the threshold, it continues moving forward. When the distance becomes less than MIN_DISTANCE_BACK, the Stop() function is called to stop the robot.The checkDirection() function is used to determine if there's an obstacle in the left, right, or front direction. Based on the detected direction, the robot will turn left, turn right, or move forward. Serial messages are printed to help with debugging.
int getDistance() //Measure the distance to an object{
unsigned long pulseTime; //Create a variable to store the pulse travel time
int distance; //Create a variable to store the calculated distance
digitalWrite(trig, HIGH); //Generate a 10 microsecond pulse
delayMicroseconds(10);
digitalWrite(trig, LOW);
pulseTime = pulseIn(echo, HIGH); //Measure the time for the pulse to return
distance = pulseTime / 29 / 2; //Calculate the object distance based on the
pulse time
Serial.println(distance);
return distance;
This function measures the distance to an object using the Ultrasonic sensor. It generates a trigger pulse and measures the time for the pulse to return. Calculate and returns the distance based on the measured time.
int checkDirection() //Check the left,Front and right directions and decide which way to turn
int distances [3] = {0,0,0}; //Left ,right and Front distances
int turnDir; //Direction to turn, 0 left, 1 turn around, 2 right, 3 forward
servoLook.write(180); //Turn servo to look left
delay(500);
distances [0] = getDistance(); //Get the left object distance
servoLook.write(90); //Turn servo to look front
delay(500);
distances [3] = getDistance(); //Get the front object distance
servoLook.write(0); //Turn servo to look right
delay(1000);
distances [1] = getDistance(); //Get the right object distance
if (distances[0]<=25 && distances[1]<=25) //If both directions are blocked, move forward turnDir = 3; else if (distances[0]>=distances[1]) //If left has more space, turn left
turnDir = 0; //left
else if (distances[0]
This section of the code handles the obstacle-avoidance strategy for the car's movement. It continually monitors obstacle distances in three directions left, right, and front by utilizing a servo motor. After each scan, it calculates the distances to nearby obstacles. If both the left and right directions have close obstacles, the car proceeds forward. If there's more space on the left side, it steers the car left, and if the right side is more open, it directs the car to the right. If all three directions (front, left, and right) have obstructions nearby, the car is instructed to perform a U-turn. These directions are communicated by returning specific values: 0 for left, 2 for right, 3 for forward, and 1 for turning around.
include
This block includes the Servo library, which is necessary for controlling the servo motor.
// Ultrasonic sensor pins
define trig 2
define echo 4
// RGB led pins
define LR 9 // Led Right
define LC 13 // Led Center
define LL 10 // Led Left
define LRR A3 // Led Right Red
define LCR A2 // Led Center Red
define LLR A1 // Led Left Red
In this block, various pin constants are defined for components such as the Ultrasonic sensor and RGB LEDs. These constants are used to specify which pins on the Arduino are connected to each component.
// Motor control pins
define LEFT_MOTOR_PIN1 8
define LEFT_MOTOR_PIN2 7
define RIGHT_MOTOR_PIN1 12
define RIGHT_MOTOR_PIN2 11
define ENA 6 // Enable A pin for motor speed control
define ENB 3 // Enable B pin for motor speed control
These lines define digital pins of Arduino (pin7,pin8,pin12 and pin11) for the L298N motor driver inputs to control the DC motors. The pins in1 and in2 control one motor, and the pins in3 and in4 control the other motor. Ena and Enb control the speed of the motor.
// Distance thresholds for obstacle detection
define MIN_DISTANCE_BACK 12
This block defines threshold values. MIN_DISTANCE_BACK represents the minimum distance required from an obstacle to stop.
void setup() {
// Set motor control pins as outputs
pinMode(LEFT_MOTOR_PIN1, OUTPUT);
pinMode(LEFT_MOTOR_PIN2, OUTPUT);
pinMode(RIGHT_MOTOR_PIN1, OUTPUT);
pinMode(RIGHT_MOTOR_PIN2, OUTPUT);
pinMode(ENA, OUTPUT);
pinMode(ENB, OUTPUT);
pinMode(LR, OUTPUT);
pinMode(LC, OUTPUT);
pinMode(LL, OUTPUT);
pinMode(LRR, OUTPUT);
pinMode(LCR, OUTPUT);
pinMode(LLR, OUTPUT);
digitalWrite(LR, LOW);
digitalWrite(LC, LOW);
digitalWrite(LL, LOW);
analogWrite(LRR, 0);
analogWrite(LCR, 0);
analogWrite(LLR, 0);
servoLook.attach(5);
//Set the Trig pins as output pins
pinMode(trig, OUTPUT);
//Set the Echo pins as input pins
pinMode(echo, INPUT);
analogWrite(ENA, 53.5); // speed for motor A 0-LOW speed, 255-Full speed
analogWrite(ENB, 45); // speed for motor B
// Initialize the serial communication for debugging
Serial.begin(9600);
}
In the setup() function, various initializations take place. This includes configuring motor control pins, LED pins, and sensor pins as either OUTPUT or INPUT. It also sets the initial states for LEDs and RGB LEDs to LOW or 0. Additionally, the Servo motor is attached to pin 5, motor speed is adjusted using analogWrite() for ENA and ENB, and serial communication is initiated for debugging (though this part is optional).
void loop()
{
servoLook.write(90);
delay(750);
int distance = getDistance();
if (distance >= MIN_DISTANCE_BACK)
{
moveForward();
Serial.println("forward"); }
while(distance >= MIN_DISTANCE_BACK)
{
distance = getDistance();
delay(50);
}
Stop();
int turnDir = checkDirection();
Serial.println(turnDir);
switch(turnDir)
{
case 0: //Turn left
Serial.println("Left");
turnLeft();
delay(425);
Stop();
break;
case 2: //Turn right
Serial.println("Right");
turnRight();
delay(415);
Stop();
break;
case 3: //move forward
Serial.println("Forward");
moveForward();
break;
}
}
This is the main loop of the code, executed continuously. The servo motor is set to look straight ahead, and there's a delay for it to settle. The getDistance() function is used to measure the distance using the Ultrasonic sensor. If the measured distance is greater than or equal to MIN_DISTANCE_BACK, the robot is instructed to move forward. While the distance is above the threshold, it continues moving forward. When the distance becomes less than MIN_DISTANCE_BACK, the Stop() function is called to stop the robot.The checkDirection() function is used to determine if there's an obstacle in the left, right, or front direction.Based on the detected direction, the robot will turn left, turn right, or move forward.Serial messages are printed to help with debugging.
int getDistance() //Measure the distance to an object{
unsigned long pulseTime; //Create a variable to store the pulse travel time
int distance; //Create a variable to store the calculated distance
digitalWrite(trig, HIGH); //Generate a 10 microsecond pulse
delayMicroseconds(10);
digitalWrite(trig, LOW);
pulseTime = pulseIn(echo, HIGH); //Measure the time for the pulse to return
distance = pulseTime / 29 / 2; //Calculate the object distance based on the
pulse time
Serial.println(distance);
return distance;
This function measures the distance to an object using the Ultrasonic sensor. It generates a trigger pulse and measures the time for the pulse to return. Calculate and returns the distance based on the measured time.
int checkDirection() //Check the left,Front and right directions and decide which way to turn
int distances [3] = {0,0,0}; //Left ,right and Front distances
int turnDir; //Direction to turn, 0 left, 1 turn around, 2 right, 3 forward
servoLook.write(180); //Turn servo to look left
delay(500);
distances [0] = getDistance(); //Get the left object distance
servoLook.write(90); //Turn servo to look front
delay(500);
distances [3] = getDistance(); //Get the front object distance
servoLook.write(0); //Turn servo to look right
delay(1000);
distances [1] = getDistance(); //Get the right object distance
if (distances[0]<=25 && distances[1]<=25) //If both directions are blocked, move forward turnDir = 3; else if (distances[0]>=distances[1]) //If left has more space, turn left
turnDir = 0; //left
else if (distances[0]
void moveBackward() {
digitalWrite(LR, LOW);
digitalWrite(LC, LOW); // All Green light turn off
digitalWrite(LL, LOW);
analogWrite(LRR, 255);
analogWrite(LCR, 255); // All Red light turn on
analogWrite(LLR, 255);
digitalWrite(LEFT_MOTOR_PIN1, HIGH);
digitalWrite(LEFT_MOTOR_PIN2, LOW);
digitalWrite(RIGHT_MOTOR_PIN1, HIGH);
digitalWrite(RIGHT_MOTOR_PIN2, LOW);
}void turnRight() {
analogWrite(ENA, 100); // speed for motor A
analogWrite(ENB, 90); // speed for motor B
digitalWrite(LR, HIGH);
digitalWrite(LC, LOW); // right side Green light turn on
digitalWrite(LL, LOW);
analogWrite(LRR, 0);
analogWrite(LCR, 255); // Left and Middle Red light turn on
analogWrite(LLR, 255);
digitalWrite(LEFT_MOTOR_PIN1, HIGH);
digitalWrite(LEFT_MOTOR_PIN2, LOW);
digitalWrite(RIGHT_MOTOR_PIN1, LOW);
digitalWrite(RIGHT_MOTOR_PIN2, HIGH);
}
void turnLeft() {
analogWrite(ENA, 100); // speed for motor A
analogWrite(ENB, 90); // speed for motor B
digitalWrite(LR, LOW);
digitalWrite(LC, LOW); // left side Green light turn on
digitalWrite(LL, HIGH);
analogWrite(LRR, 255);
analogWrite(LCR, 255); // right and Middle Red light turn on
analogWrite(LLR, 0);
digitalWrite(LEFT_MOTOR_PIN1, LOW);
digitalWrite(LEFT_MOTOR_PIN2, HIGH);
digitalWrite(RIGHT_MOTOR_PIN1, HIGH);
digitalWrite(RIGHT_MOTOR_PIN2, LOW);
}
void Stop() {
analogWrite(ENA, 0); // speed for motor A
analogWrite(ENB, 0); // speed for motor B
digitalWrite(LR, LOW);
digitalWrite(LC, LOW);
digitalWrite(LL, LOW);
analogWrite(LRR, 255);
analogWrite(LCR, 255);
analogWrite(LLR, 255);
analogWrite(ENA, 0); // speed for motor A
analogWrite(ENB, 0); // speed for motor B
digitalWrite(LEFT_MOTOR_PIN1, LOW);
digitalWrite(LEFT_MOTOR_PIN2, LOW);
digitalWrite(RIGHT_MOTOR_PIN1, LOW);
digitalWrite(RIGHT_MOTOR_PIN2, LOW);
The 2WD Obstacle-Avoiding Car: Control Functions
Specific functions that move and determine the direction of the car depending on detected obstacles form the core of the Arduino based obstacle avoiding car.
moveForward(): This function lets the robot move forward by setting motors of both to move. The green lights are lit when going forward, and red are not lit.
moveBackward(): This function activates the red lights while the motor speeds are updated to move the car backward when the car needs to move backward. The switches are turned off so the lights on the green save image.
turnRight(): Appropriately changing the motor speed makes this function turn the car to the right. While the other lights are red, it turns on the right – side green light to indicate a right turn.
turnLeft(): This function adjusts the motor speed for turning left, and turns the left-side green light green, and the others red to show the car has turned left.
Stop(): This function will bring the car to a halt, by turning off all lights and set their motor speeds to zero.
The Obstacle avoiding Car, how it works
The HC SR04 Ultrasonic Sensor is the primary component behind the car’s obstacle detection using sound waves to determine how far is the car from the nearby objects. Due to its affordable cost and its size, the sensor is effective for projects that require sensitivity to distance.
The project consists of six essential components: I was also using the Arduino obstacle avoiding 2WD kit, Arduino Uno, an ultrasonic sensor, DC motors, servo motor, and an L298N motor driver. When powered on, the servo motor starts rotating to measure distances in three directions: left, right, and front. Wherever you have more space, the car decides where it’s going.
For example, the Arduino Uno is pre programmed with a threshold distance that a robot will react when it is reached. Ultrasound used to detect objects closer than this distance and if it does it signals the Arduino which then commands the motor driver for STOP. The car turns in whatever direction has been determined by the servo motor to be the best direction after the servo motor re scans the surrounding area. This repeats and the car autonomously navigates without hitting obstacles.
RGB LEDs provide Visual Feedback.
To provide visual cues for movement, three RGB LEDs are mounted on the car's underside:
Red LEDs indicate a stop.
The car forward is lit by Green LED.
When right or left, the right or left side LED turns green and all others turn red.
Summary and Applications
An autonomous obstacle avoiding car using Arduino Uno is successfully demonstrated in this project. It comprises an ultrasonic sensor for measuring the distance, a servo motor for scanning the surrounding, and an L298N motor driver for controlling car motors. This car demonstrates important concepts of autonomous robotics, and can additionally be used as a practical beginner level educational project. This project has such wide possibilities for expansion and adaptation as far as extending to delivery robots or warehouse management systems.
Once enthusiasts have a good understanding of these basics, (they) will be able to make more advanced projects in robotics and electronics easily. If you like what you see, feel free to explore some of our other robotic projects we’ve built in the past for other inspiring ideas.
//Arduino Obstacle Avoiding Car Code
//by ElectroGlobal
#include <Servo.h>
// Ultrasonic sensor pins
#define trig 2
#define echo 4
// RGB led pins
#define LR 9 // Led Right
#define LC 13 // Led Center
#define LL 10 // Led Left
#define LRR A3 // Led Right Red
#define LCR A2 // Led Center Red
#define LLR A1 // Led Left Red
// Motor control pins
#define LEFT_MOTOR_PIN1 8
#define LEFT_MOTOR_PIN2 7
#define RIGHT_MOTOR_PIN1 12
#define RIGHT_MOTOR_PIN2 11
#define ENA 6 // Enable A pin for motor speed control
#define ENB 3 // Enable B pin for motor speed control
// Distance thresholds for obstacle detection
//#define MAX_DISTANCE 80
#define MIN_DISTANCE_BACK 12
//float timeOut = 2*(MAX_DISTANCE+10)/100/340*1000000;
// Maximum and minimum motor speeds
#define MAX_SPEED 100
#define MIN_SPEED 75
Servo servoLook;
void setup() {
// Set motor control pins as outputs
pinMode(LEFT_MOTOR_PIN1, OUTPUT);
pinMode(LEFT_MOTOR_PIN2, OUTPUT);
pinMode(RIGHT_MOTOR_PIN1, OUTPUT);
pinMode(RIGHT_MOTOR_PIN2, OUTPUT);
pinMode(ENA, OUTPUT);
pinMode(ENB, OUTPUT);
pinMode(LR, OUTPUT);
pinMode(LC, OUTPUT);
pinMode(LL, OUTPUT);
pinMode(LRR, OUTPUT);
pinMode(LCR, OUTPUT);
pinMode(LLR, OUTPUT);
digitalWrite(LR, LOW);
digitalWrite(LC, LOW);
digitalWrite(LL, LOW);
analogWrite(LRR, 0);
analogWrite(LCR, 0);
analogWrite(LLR, 0);
servoLook.attach(5);
//Set the Trig pins as output pins
pinMode(trig, OUTPUT);
//Set the Echo pins as input pins
pinMode(echo, INPUT);
analogWrite(ENA, 53.5); // speed for motor A 0-LOW speed, 255-Full speed
analogWrite(ENB, 45); // speed for motor B
// Initialize the serial communication for debugging
Serial.begin(9600);
}
void loop() {
servoLook.write(90);
delay(750);
int distance = getDistance();
if (distance >= MIN_DISTANCE_BACK) {
moveForward();
Serial.println("forward");
}
while(distance >= MIN_DISTANCE_BACK)
{
distance = getDistance();
delay(50);
}
Stop();
int turnDir = checkDirection();
Serial.println(turnDir);
switch(turnDir)
{
case 0: //Turn left
Serial.println("Left");
turnLeft();
delay(425);
Stop();
break;
case 2: //Turn right
Serial.println("Right");
turnRight();
delay(415);
Stop();
break;
case 3: //move forward
Serial.println("Forward");
moveForward();
break;
}
}
int getDistance() //Measure the distance to an object
{
unsigned long pulseTime; //Create a variable to store the pulse travel time
int distance; //Create a variable to store the calculated distance
digitalWrite(trig, HIGH); //Generate a 10 microsecond pulse
delayMicroseconds(10);
digitalWrite(trig, LOW);
pulseTime = pulseIn(echo, HIGH); //Measure the time for the pulse to return
distance = pulseTime / 29 / 2; //Calculate the object distance based on the pulse time
Serial.println(distance);
return distance;
}
int checkDirection() //Check the left and right directions and decide which way to turn
{
int distances [3] = {0,0,0}; //Left ,right and Front distances
int turnDir; //Direction to turn, 0 left, 1 turn around, 2 right, 3 forward
servoLook.write(180); //Turn servo to look left
delay(500);
distances [0] = getDistance(); //Get the left object distance
servoLook.write(90); //Turn servo to look left
delay(500);
distances [3] = getDistance();
servoLook.write(0); //Turn servo to look right
delay(1000);
distances [1] = getDistance(); //Get the right object distance
if (distances[0]<=25 && distances[1]<=25) //If both directions are blocked, move forward
turnDir = 3;
else if (distances[0]>=distances[1]) //If left has more space, turn left
turnDir = 0; //left
else if (distances[0]<distances[1]) //If right has more space, turn right
turnDir = 2; //right
//else if (distances[0]<=50 && distances[1]<=50 && distances[3]<=50) //If All directions are blocked, turn around
//turnDir = 1;
return turnDir;
}
// Motor control functions
void moveForward() {
analogWrite(ENA, 60.5); // speed for motor A
analogWrite(ENB, 52); // speed for motor B
digitalWrite(LR, HIGH);
digitalWrite(LC, HIGH); // All Green light turn on
digitalWrite(LL, HIGH);
analogWrite(LRR, 0);
analogWrite(LCR, 0); // All Red light turn off
analogWrite(LLR, 0);
digitalWrite(LEFT_MOTOR_PIN1, LOW);
digitalWrite(LEFT_MOTOR_PIN2, HIGH);
digitalWrite(RIGHT_MOTOR_PIN1, LOW);
digitalWrite(RIGHT_MOTOR_PIN2, HIGH);
}
void moveBackward() {
digitalWrite(LR, LOW);
digitalWrite(LC, LOW); // All Green light turn off
digitalWrite(LL, LOW);
analogWrite(LRR, 255);
analogWrite(LCR, 255); // All Red light turn on
analogWrite(LLR, 255);
digitalWrite(LEFT_MOTOR_PIN1, HIGH);
digitalWrite(LEFT_MOTOR_PIN2, LOW);
digitalWrite(RIGHT_MOTOR_PIN1, HIGH);
digitalWrite(RIGHT_MOTOR_PIN2, LOW);
}
void turnRight() {
analogWrite(E</div><div class="mt-12 pt-6 border-t border-border"><p class="text-[10px] font-black uppercase tracking-widest text-muted-foreground mb-3">Tagged</p><div class="relative flex items-center gap-1 "><button aria-label="Scroll left" class="
shrink-0 h-7 w-7 rounded-full border border-border bg-background
flex items-center justify-center text-muted-foreground
hover:text-primary hover:border-primary/40 transition-all
opacity-0 pointer-events-none
"><svg class="h-3 w-3" fill="none" viewBox="0 0 24 24" stroke="currentColor"><path stroke-linecap="round" stroke-linejoin="round" stroke-width="2.5" d="M15 19l-7-7 7-7"></path></svg></button><div class="flex gap-2 overflow-x-auto scrollbar-none scroll-smooth flex-1" style="scrollbar-width:none;-ms-overflow-style:none"><a class="
shrink-0 px-3 py-1 rounded-full text-[10px] font-black uppercase tracking-widest
border transition-colors whitespace-nowrap
bg-muted border-border text-muted-foreground hover:bg-primary/10 hover:text-primary hover:border-primary/30
" href="/blogs?tag=arduino">arduino</a><a class="
shrink-0 px-3 py-1 rounded-full text-[10px] font-black uppercase tracking-widest
border transition-colors whitespace-nowrap
bg-muted border-border text-muted-foreground hover:bg-primary/10 hover:text-primary hover:border-primary/30
" href="/blogs?tag=arduino%20uno%20specifications">arduino uno specifications</a><a class="
shrink-0 px-3 py-1 rounded-full text-[10px] font-black uppercase tracking-widest
border transition-colors whitespace-nowrap
bg-muted border-border text-muted-foreground hover:bg-primary/10 hover:text-primary hover:border-primary/30
" href="/blogs?tag=robotics">robotics</a></div><button aria-label="Scroll right" class="
shrink-0 h-7 w-7 rounded-full border border-border bg-background
flex items-center justify-center text-muted-foreground
hover:text-primary hover:border-primary/40 transition-all
opacity-0 pointer-events-none
"><svg class="h-3 w-3" fill="none" viewBox="0 0 24 24" stroke="currentColor"><path stroke-linecap="round" stroke-linejoin="round" stroke-width="2.5" d="M9 5l7 7-7 7"></path></svg></button></div></div><div class="mt-8 pt-6 border-t border-border flex items-center gap-3"><p class="text-[10px] font-black uppercase tracking-widest text-muted-foreground">Share</p><a href="https://twitter.com/intent/tweet?text=7%20Surprising%20Arduino%20Uno%20Specifications%20You%20Can't%20Ignore%20and%20Obstacle-Avoiding%20Cars%3A%20Roadmap%20to%20a%20Safer%20World&url=https%3A%2F%2Felectroglobal.in%2Fblogs%2F7-surprising-arduino-uno-specifications" target="_blank" rel="noopener noreferrer" class="h-8 w-8 rounded-full border border-border flex items-center justify-center text-muted-foreground hover:text-primary hover:border-primary/40 transition-colors"><svg class="h-3.5 w-3.5" fill="currentColor" viewBox="0 0 24 24"><path d="M18.244 2.25h3.308l-7.227 8.26 8.502 11.24H16.17l-4.714-6.231-5.401 6.231H2.741l7.73-8.835L1.254 2.25H8.08l4.259 5.622zm-1.161 17.52h1.833L7.084 4.126H5.117z"></path></svg></a><a href="https://wa.me/?text=7%20Surprising%20Arduino%20Uno%20Specifications%20You%20Can't%20Ignore%20and%20Obstacle-Avoiding%20Cars%3A%20Roadmap%20to%20a%20Safer%20World%20https%3A%2F%2Felectroglobal.in%2Fblogs%2F7-surprising-arduino-uno-specifications" target="_blank" rel="noopener noreferrer" class="h-8 w-8 rounded-full border border-border flex items-center justify-center text-muted-foreground hover:text-green-600 hover:border-green-300 transition-colors"><svg class="h-3.5 w-3.5" fill="currentColor" viewBox="0 0 24 24"><path d="M17.472 14.382c-.297-.149-1.758-.867-2.03-.967-.273-.099-.471-.148-.67.15-.197.297-.767.966-.94 1.164-.173.199-.347.223-.644.075-.297-.15-1.255-.463-2.39-1.475-.883-.788-1.48-1.761-1.653-2.059-.173-.297-.018-.458.13-.606.134-.133.298-.347.446-.52.149-.174.198-.298.298-.497.099-.198.05-.371-.025-.52-.075-.149-.669-1.612-.916-2.207-.242-.579-.487-.5-.669-.51-.173-.008-.371-.01-.57-.01-.198 0-.52.074-.792.372-.272.297-1.04 1.016-1.04 2.479 0 1.462 1.065 2.875 1.213 3.074.149.198 2.096 3.2 5.077 4.487.709.306 1.262.489 1.694.625.712.227 1.36.195 1.871.118.571-.085 1.758-.719 2.006-1.413.248-.694.248-1.289.173-1.413-.074-.124-.272-.198-.57-.347m-5.421 7.403h-.004a9.87 9.87 0 01-5.031-1.378l-.361-.214-3.741.982.998-3.648-.235-.374a9.86 9.86 0 01-1.51-5.26c.001-5.45 4.436-9.884 9.888-9.884 2.64 0 5.122 1.03 6.988 2.898a9.825 9.825 0 012.893 6.994c-.003 5.45-4.437 9.884-9.885 9.884m8.413-18.297A11.815 11.815 0 0012.05 0C5.495 0 .16 5.335.157 11.892c0 2.096.547 4.142 1.588 5.945L.057 24l6.305-1.654a11.882 11.882 0 005.683 1.448h.005c6.554 0 11.89-5.335 11.893-11.893a11.821 11.821 0 00-3.48-8.413z"></path></svg></a><button class="h-8 w-8 rounded-full border border-border flex items-center justify-center text-muted-foreground hover:text-primary hover:border-primary/40 transition-colors" title="Copy link"><svg class="h-3.5 w-3.5" fill="none" viewBox="0 0 24 24" stroke="currentColor"><path stroke-linecap="round" stroke-linejoin="round" stroke-width="2" d="M8 16H6a2 2 0 01-2-2V6a2 2 0 012-2h8a2 2 0 012 2v2m-6 12h8a2 2 0 002-2v-8a2 2 0 00-2-2h-8a2 2 0 00-2 2v8a2 2 0 002 2z"></path></svg></button></div><section aria-label="Related content" class="container mx-auto px-4 max-w-6xl py-6" style="border-top:1px solid #c7d3dd"><h2 class="text-sm font-bold mb-4" style="color:#0a0a0a">Related Content</h2><div class="mb-4"><h3 class="text-xs font-semibold uppercase tracking-widest mb-2" style="color:#5b6979">Related Products</h3><ul class="flex flex-wrap gap-2"><li><a href="https://electroglobal.in/store/arduino-uno-r3-development-board" class="text-xs font-medium px-3 py-1 rounded-full transition-all duration-150 hover:bg-[#0a0a0a] hover:text-white hover:border-[#0a0a0a]" style="background-color:#e8edf1;color:#5b6979;border:1px solid #c7d3dd">Arduino Uno R3 Development Board: Arduino IDE Compatible, Arduino Board for Arduino Uno Projects</a></li></ul></div><div class="mb-4"><h3 class="text-xs font-semibold uppercase tracking-widest mb-2" style="color:#5b6979">From the Blog</h3><ul class="flex flex-wrap gap-2"><li><a href="https://electroglobal.in/blogs/5-shocking-facts-about-arduino-cost-value" class="text-xs font-medium px-3 py-1 rounded-full transition-all duration-150 hover:bg-[#0a0a0a] hover:text-white hover:border-[#0a0a0a]" style="background-color:#e8edf1;color:#5b6979;border:1px solid #c7d3dd">Arduino Bluetooth-Controlled Robotic Arm Car for Pick and Place Tasks</a></li><li><a href="https://electroglobal.in/blogs/guide-arduino-and-esp8266-iot-projects" class="text-xs font-medium px-3 py-1 rounded-full transition-all duration-150 hover:bg-[#0a0a0a] hover:text-white hover:border-[#0a0a0a]" style="background-color:#e8edf1;color:#5b6979;border:1px solid #c7d3dd">Voice Connection based Security system with ESP8266 and Arduino for IoT in Home Automation</a></li><li><a href="https://electroglobal.in/blogs/building-a-wireless-bluetooth-controlled-robot-car-with-arduino-a-complete-instruction" class="text-xs font-medium px-3 py-1 rounded-full transition-all duration-150 hover:bg-[#0a0a0a] hover:text-white hover:border-[#0a0a0a]" style="background-color:#e8edf1;color:#5b6979;border:1px solid #c7d3dd">Building a Wireless Bluetooth Controlled Robot Car with Arduino: A Complete Instruction</a></li><li><a href="https://electroglobal.in/blogs/obstacle-avoiding-robo-kit" class="text-xs font-medium px-3 py-1 rounded-full transition-all duration-150 hover:bg-[#0a0a0a] hover:text-white hover:border-[#0a0a0a]" style="background-color:#e8edf1;color:#5b6979;border:1px solid #c7d3dd">Obstacle Avoiding Robo Kit - ElectroGlobal</a></li><li><a href="https://electroglobal.in/blogs/obstacle-avoiding-robo-kit" class="text-xs font-medium px-3 py-1 rounded-full transition-all duration-150 hover:bg-[#0a0a0a] hover:text-white hover:border-[#0a0a0a]" style="background-color:#e8edf1;color:#5b6979;border:1px solid #c7d3dd">Obstacle Avoiding Robo Kit - ElectroGlobal</a></li></ul></div></section><div class="mt-10"><a class="inline-flex items-center gap-2 px-5 py-2.5 rounded-2xl border border-border text-sm font-bold text-muted-foreground hover:text-primary hover:border-primary/40 transition-all group" href="/blogs"><svg class="h-4 w-4 group-hover:-translate-x-0.5 transition-transform" fill="none" viewBox="0 0 24 24" stroke="currentColor"><path stroke-linecap="round" stroke-linejoin="round" stroke-width="2" d="M15 19l-7-7 7-7"></path></svg>Back to Blog</a></div></main><aside class="hidden lg:flex flex-col gap-5 w-72 shrink-0"><div class="rounded-2xl border border-border bg-card overflow-hidden"><div class="px-5 py-3.5 border-b border-border bg-muted/30"><p class="text-[10px] font-black uppercase tracking-widest text-muted-foreground">Recent Posts</p></div><div class="divide-y divide-border"><a class="flex items-center gap-3 px-4 py-3 hover:bg-muted/40 transition-colors group" href="/blogs/3-7v-lipo-battery-2000mah"><img alt="Choosing the Best 3.7 V LiPo Battery 2000mAh for Reliable DIY Electronics" loading="lazy" width="48" height="48" decoding="async" data-nimg="1" class="rounded-xl object-cover shrink-0 border border-border" style="color:transparent" src="https://electroglobal-products.s3.ap-south-1.amazonaws.com/blog-images/choosing-the-right-3-7-v-lipo-battery-2000mah-for-diy-electronics-project-13ef9216-841a-4ef9-9b39-8451189b2ec6.webp"/><div class="flex-1 min-w-0"><p class="text-xs font-bold line-clamp-2 leading-snug group-hover:text-primary transition-colors">Choosing the Best 3.7 V LiPo Battery 2000mAh for Reliable DIY Electronics</p><p class="text-[10px] text-muted-foreground mt-0.5">6 June 2026</p></div></a><a class="flex items-center gap-3 px-4 py-3 hover:bg-muted/40 transition-colors group" href="/blogs/3000mah-lipo-battery-guide"><img alt="Raspberry Pi Pico Battery Guide Featuring 3000mAh LiPo Battery Insights" loading="lazy" width="48" height="48" decoding="async" data-nimg="1" class="rounded-xl object-cover shrink-0 border border-border" style="color:transparent" src="https://electroglobal-products.s3.ap-south-1.amazonaws.com/blog-images/raspberry-pi-pico-battery-guide-featuring-3000mah-lipo-battery-insights-444bd1c8-342c-4790-94ed-e028864b70f8.webp"/><div class="flex-1 min-w-0"><p class="text-xs font-bold line-clamp-2 leading-snug group-hover:text-primary transition-colors">Raspberry Pi Pico Battery Guide Featuring 3000mAh LiPo Battery Insights</p><p class="text-[10px] text-muted-foreground mt-0.5">5 June 2026</p></div></a><a class="flex items-center gap-3 px-4 py-3 hover:bg-muted/40 transition-colors group" href="/blogs/heating-3-7v-lipo-battery"><img alt="Understanding and Managing Heating Issues in 3.7 V LiPo Battery Packs" loading="lazy" width="48" height="48" decoding="async" data-nimg="1" class="rounded-xl object-cover shrink-0 border border-border" style="color:transparent" src="https://electroglobal-products.s3.ap-south-1.amazonaws.com/blog-images/understanding-and-managing-heating-issues-in-3-7-v-lipo-battery-packs-8b3427bd-47a5-4c68-8f2c-5f7676caba79.webp"/><div class="flex-1 min-w-0"><p class="text-xs font-bold line-clamp-2 leading-snug group-hover:text-primary transition-colors">Understanding and Managing Heating Issues in 3.7 V LiPo Battery Packs</p><p class="text-[10px] text-muted-foreground mt-0.5">4 June 2026</p></div></a><a class="flex items-center gap-3 px-4 py-3 hover:bg-muted/40 transition-colors group" href="/blogs/optimize-esp32-3000mah-lipo-409756"><img alt="Optimize ESP32 Battery Life with a 3000mAh LiPo Battery" loading="lazy" width="48" height="48" decoding="async" data-nimg="1" class="rounded-xl object-cover shrink-0 border border-border" style="color:transparent" src="https://electroglobal-products.s3.ap-south-1.amazonaws.com/blog-images/practical-power-optimization-techniques-for-esp32-with-3000mah-lipo-battery-packs (1)-8e922b22-17d0-4942-ae0a-a5030763ed77.webp"/><div class="flex-1 min-w-0"><p class="text-xs font-bold line-clamp-2 leading-snug group-hover:text-primary transition-colors">Optimize ESP32 Battery Life with a 3000mAh LiPo Battery</p><p class="text-[10px] text-muted-foreground mt-0.5">2 June 2026</p></div></a></div></div><div class="rounded-2xl border border-border bg-card overflow-hidden"><div class="px-5 py-3.5 border-b border-border bg-muted/30"><p class="text-[10px] font-black uppercase tracking-widest text-muted-foreground">Categories</p></div><div class="p-4"><div class="relative flex items-center gap-1 "><button aria-label="Scroll left" class="
shrink-0 h-7 w-7 rounded-full border border-border bg-background
flex items-center justify-center text-muted-foreground
hover:text-primary hover:border-primary/40 transition-all
opacity-0 pointer-events-none
"><svg class="h-3 w-3" fill="none" viewBox="0 0 24 24" stroke="currentColor"><path stroke-linecap="round" stroke-linejoin="round" stroke-width="2.5" d="M15 19l-7-7 7-7"></path></svg></button><div class="flex gap-2 overflow-x-auto scrollbar-none scroll-smooth flex-1" style="scrollbar-width:none;-ms-overflow-style:none"><a class="
shrink-0 px-3 py-1 rounded-full text-[10px] font-black uppercase tracking-widest
border transition-colors whitespace-nowrap
bg-muted border-border text-muted-foreground hover:bg-primary/10 hover:text-primary hover:border-primary/30
" href="/blogs?tag=arduino">arduino</a><a class="
shrink-0 px-3 py-1 rounded-full text-[10px] font-black uppercase tracking-widest
border transition-colors whitespace-nowrap
bg-muted border-border text-muted-foreground hover:bg-primary/10 hover:text-primary hover:border-primary/30
" href="/blogs?tag=arduino%20uno%20specifications">arduino uno specifications</a><a class="
shrink-0 px-3 py-1 rounded-full text-[10px] font-black uppercase tracking-widest
border transition-colors whitespace-nowrap
bg-muted border-border text-muted-foreground hover:bg-primary/10 hover:text-primary hover:border-primary/30
" href="/blogs?tag=robotics">robotics</a></div><button aria-label="Scroll right" class="
shrink-0 h-7 w-7 rounded-full border border-border bg-background
flex items-center justify-center text-muted-foreground
hover:text-primary hover:border-primary/40 transition-all
opacity-0 pointer-events-none
"><svg class="h-3 w-3" fill="none" viewBox="0 0 24 24" stroke="currentColor"><path stroke-linecap="round" stroke-linejoin="round" stroke-width="2.5" d="M9 5l7 7-7 7"></path></svg></button></div></div></div><div class="rounded-2xl border border-primary/20 bg-primary/5 p-5"><div class="h-10 w-10 rounded-xl bg-primary/10 flex items-center justify-center mb-3"><svg class="h-5 w-5 text-primary" fill="none" viewBox="0 0 24 24" stroke="currentColor"><path stroke-linecap="round" stroke-linejoin="round" stroke-width="2" d="M3 8l7.89 5.26a2 2 0 002.22 0L21 8M5 19h14a2 2 0 002-2V7a2 2 0 00-2-2H5a2 2 0 00-2 2v10a2 2 0 002 2z"></path></svg></div><p class="text-sm font-black text-foreground mb-1">Stay Updated</p><p class="text-xs text-muted-foreground mb-4 leading-relaxed">Get the latest electronics guides & tutorials delivered to your inbox.</p><a class="block text-center w-full py-2 rounded-xl bg-primary text-primary-foreground text-xs font-bold hover:opacity-90 transition-opacity" href="/blogs">Browse All Posts</a></div></aside></div></div></div><!--$--><!--/$--></main><footer style="background:#1a1a1a;border-top:1px solid #2e2e2e" class="pt-16 pb-0"><div class="mx-auto max-w-300 px-4 md:px-8"><div class="grid grid-cols-1 md:grid-cols-3 lg:grid-cols-5 gap-8 mb-12"><div class="space-y-5 lg:col-span-1 flex flex-col items-center md:items-start"><div style="display:flex;align-items:center;gap:12px" class="justify-center md:justify-start"><img alt="ElectroGlobal" loading="lazy" width="200" height="58" decoding="async" data-nimg="1" style="color:transparent;height:125px;width:auto;object-fit:contain;flex-shrink:0" src="/footer_logo.webp"/></div><div class="pt-1"></div><div class="flex items-start gap-2 text-muted-foreground mb-2"><svg xmlns="http://www.w3.org/2000/svg" width="24" height="24" viewBox="0 0 24 24" fill="none" stroke="currentColor" stroke-width="2" stroke-linecap="round" stroke-linejoin="round" class="lucide lucide-map-pin h-4 w-4 shrink-0 mt-1" aria-hidden="true" style="color:#96ff1a"><path d="M20 10c0 4.993-5.539 10.193-7.399 11.799a1 1 0 0 1-1.202 0C9.539 20.193 4 14.993 4 10a8 8 0 0 1 16 0"></path><circle cx="12" cy="10" r="3"></circle></svg><span class="flex-1 text-[11px]">B – 147 Anand Vihar, Railway Colony, Jagatpura, Jaipur, Rajasthan 302017.</span></div></div><div><h4 class="hidden md:block font-bold mb-5 text-xs tracking-widest uppercase" style="color:#a0a0a0">Quick Links</h4><ul class="hidden md:block space-y-3 text-sm"><li><a class="text-[#b0b0b0] font-medium no-underline transition-colors duration-150 hover:text-[#96ff1a]" href="/store">Shop All</a></li><li><a class="text-[#b0b0b0] font-medium no-underline transition-colors duration-150 hover:text-[#96ff1a]" href="/categories">Categories</a></li><li><a class="text-[#b0b0b0] font-medium no-underline transition-colors duration-150 hover:text-[#96ff1a]" href="/offers">Offers</a></li><li><a class="text-[#b0b0b0] font-medium no-underline transition-colors duration-150 hover:text-[#96ff1a]" href="/careers">Careers</a></li><li><a class="text-[#b0b0b0] font-medium no-underline transition-colors duration-150 hover:text-[#96ff1a]" href="/about-us">About Us</a></li><li><a class="text-[#b0b0b0] font-medium no-underline transition-colors duration-150 hover:text-[#96ff1a]" href="/contact">Contact</a></li></ul><div class="md:hidden border-b border-[#2e2e2e]"><button class="w-full flex items-center justify-between py-4"><span class="font-bold text-xs tracking-widest uppercase text-[#a0a0a0]">Quick Links</span><svg xmlns="http://www.w3.org/2000/svg" width="24" height="24" viewBox="0 0 24 24" fill="none" stroke="currentColor" stroke-width="2" stroke-linecap="round" stroke-linejoin="round" class="lucide lucide-chevron-down h-4 w-4 text-[#666] transition-transform duration-200" aria-hidden="true"><path d="m6 9 6 6 6-6"></path></svg></button><div class="overflow-hidden transition-all duration-200 max-h-0"><ul class="space-y-3 text-sm pl-1"><li><a class="text-[#b0b0b0] no-underline transition-colors duration-150 hover:text-[#96ff1a]" href="/store">Shop All</a></li><li><a class="text-[#b0b0b0] no-underline transition-colors duration-150 hover:text-[#96ff1a]" href="/categories">Categories</a></li><li><a class="text-[#b0b0b0] no-underline transition-colors duration-150 hover:text-[#96ff1a]" href="/about-us">About Us</a></li><li><a class="text-[#b0b0b0] no-underline transition-colors duration-150 hover:text-[#96ff1a]" href="/contact">Contact</a></li><li><a class="text-[#b0b0b0] no-underline transition-colors duration-150 hover:text-[#96ff1a]" href="/careers">Careers</a></li></ul></div></div></div><div><h4 class="hidden md:block font-bold mb-5 text-xs tracking-widest uppercase" style="color:#a0a0a0">Customer Care</h4><ul class="hidden md:block space-y-3 text-sm"><li><a class="text-[#b0b0b0] font-medium no-underline transition-colors duration-150 hover:text-[#96ff1a]" href="/faq">FAQ</a></li><li><a class="text-[#b0b0b0] font-medium no-underline transition-colors duration-150 hover:text-[#96ff1a]" href="/shipping-policy">Shipping Policy</a></li><li><a class="text-[#b0b0b0] font-medium no-underline transition-colors duration-150 hover:text-[#96ff1a]" href="/delivery-return">Returns & Refunds</a></li><li><a class="text-[#b0b0b0] font-medium no-underline transition-colors duration-150 hover:text-[#96ff1a]" href="/privacy-policy">Privacy Policy</a></li><li><a class="text-[#b0b0b0] font-medium no-underline transition-colors duration-150 hover:text-[#96ff1a]" href="/terms-of-service">Terms of Service</a></li></ul><div class="md:hidden border-b border-[#2e2e2e]"><button class="w-full flex items-center justify-between py-4"><span class="font-bold text-xs tracking-widest uppercase text-[#a0a0a0]">Customer Care</span><svg xmlns="http://www.w3.org/2000/svg" width="24" height="24" viewBox="0 0 24 24" fill="none" stroke="currentColor" stroke-width="2" stroke-linecap="round" stroke-linejoin="round" class="lucide lucide-chevron-down h-4 w-4 text-[#666] transition-transform duration-200" aria-hidden="true"><path d="m6 9 6 6 6-6"></path></svg></button><div class="overflow-hidden transition-all duration-200 max-h-0"><ul class="space-y-3 text-sm pl-1"><li><a class="text-[#b0b0b0] no-underline transition-colors duration-150 hover:text-[#96ff1a]" href="/faq">FAQ</a></li><li><a class="text-[#b0b0b0] no-underline transition-colors duration-150 hover:text-[#96ff1a]" href="/shipping-policy">Shipping Policy</a></li><li><a class="text-[#b0b0b0] no-underline transition-colors duration-150 hover:text-[#96ff1a]" href="/delivery-return">Returns & Refunds</a></li><li><a class="text-[#b0b0b0] no-underline transition-colors duration-150 hover:text-[#96ff1a]" href="/privacy-policy">Privacy Policy</a></li><li><a class="text-[#b0b0b0] no-underline transition-colors duration-150 hover:text-[#96ff1a]" href="/terms-of-service">Terms of Service</a></li></ul></div></div></div><div><h4 class="hidden md:block font-bold mb-5 text-xs tracking-widest uppercase" style="color:#a0a0a0">Our Resources</h4><ul class="hidden md:block space-y-3 text-sm"><li><a class="text-[#b0b0b0] font-medium no-underline transition-colors duration-150 hover:text-[#96ff1a]" href="/blogs">Blog</a></li><li><a class="text-[#b0b0b0] font-medium no-underline transition-colors duration-150 hover:text-[#96ff1a]" href="/docs">Docs</a></li><li><a class="text-[#b0b0b0] font-medium no-underline transition-colors duration-150 hover:text-[#96ff1a]" href="/sitemap">Sitemap</a></li></ul><div class="md:hidden border-b border-[#2e2e2e]"><button class="w-full flex items-center justify-between py-4"><span class="font-bold text-xs tracking-widest uppercase text-[#a0a0a0]">Our Resources</span><svg xmlns="http://www.w3.org/2000/svg" width="24" height="24" viewBox="0 0 24 24" fill="none" stroke="currentColor" stroke-width="2" stroke-linecap="round" stroke-linejoin="round" class="lucide lucide-chevron-down h-4 w-4 text-[#666] transition-transform duration-200" aria-hidden="true"><path d="m6 9 6 6 6-6"></path></svg></button><div class="overflow-hidden transition-all duration-200 max-h-0"><ul class="space-y-3 text-sm pl-1"><li><a class="text-[#b0b0b0] no-underline transition-colors duration-150 hover:text-[#96ff1a]" href="/blogs">Blog</a></li></ul></div></div></div><div><h4 class="font-bold mb-5 text-xs tracking-widest uppercase" style="color:#a0a0a0">Stay Updated</h4><p class="text-sm mb-4" style="color:#888">Subscribe for the latest products and exclusive offers.</p><div class="flex gap-2 mb-6"><input type="email" placeholder="Your email address" style="flex:1;border:1.5px solid #333;border-radius:6px;padding:9px 12px;font-size:12.5px;color:#e0e0e0;background:#252525;outline:none;font-family:inherit" value=""/><button aria-label="Subscribe to newsletter" style="background:#96ff1a;color:#1a1a1a;border:none;padding:9px 14px;border-radius:6px;font-size:12px;font-weight:800;cursor:pointer;white-space:nowrap;transition:background 0.15s;opacity:1">Subscribe</button></div><div class="flex items-center gap-2 text-sm mb-3" style="color:#888"><svg xmlns="http://www.w3.org/2000/svg" width="24" height="24" viewBox="0 0 24 24" fill="none" stroke="currentColor" stroke-width="2" stroke-linecap="round" stroke-linejoin="round" class="lucide lucide-mail h-4 w-4 shrink-0" aria-hidden="true" style="color:#96ff1a"><path d="m22 7-8.991 5.727a2 2 0 0 1-2.009 0L2 7"></path><rect x="2" y="4" width="20" height="16" rx="2"></rect></svg><a href="mailto:contact@electroglobal.in" class="text-[#b0b0b0] no-underline transition-colors duration-150 hover:text-[#96ff1a]">contact@electroglobal.in</a></div><div class="flex items-center gap-2 text-sm" style="color:#888"><svg xmlns="http://www.w3.org/2000/svg" width="24" height="24" viewBox="0 0 24 24" fill="none" stroke="currentColor" stroke-width="2" stroke-linecap="round" stroke-linejoin="round" class="lucide lucide-phone h-4 w-4 shrink-0" aria-hidden="true" style="color:#96ff1a"><path d="M13.832 16.568a1 1 0 0 0 1.213-.303l.355-.465A2 2 0 0 1 17 15h3a2 2 0 0 1 2 2v3a2 2 0 0 1-2 2A18 18 0 0 1 2 4a2 2 0 0 1 2-2h3a2 2 0 0 1 2 2v3a2 2 0 0 1-.8 1.6l-.468.351a1 1 0 0 0-.292 1.233 14 14 0 0 0 6.392 6.384"></path></svg><a href="tel:+919216716124" class="text-[#b0b0b0] no-underline transition-colors duration-150 hover:text-[#96ff1a]">+91 921 671 6124</a></div></div></div><div aria-hidden="true" style="color:#1a1a1a;font-size:1px;line-height:1px;user-select:none;pointer-events:none;overflow:hidden;height:1px;max-height:1px"><p>Popular Searches</p><p><a tabindex="-1" style="color:inherit;text-decoration:none" href="/categories/development-boards">Arduino Boards</a> | <a tabindex="-1" style="color:inherit;text-decoration:none" href="/store/arduino-uno">Arduino Uno</a> | <a tabindex="-1" style="color:inherit;text-decoration:none" href="/store/arduino-nano">Arduino Nano</a> | <a tabindex="-1" style="color:inherit;text-decoration:none" href="/store/raspberry-pi-4">Raspberry Pi 4</a> | <a tabindex="-1" style="color:inherit;text-decoration:none" href="/store/raspberry-pi-pico-w">Raspberry Pi Pico W</a> | <a tabindex="-1" style="color:inherit;text-decoration:none" href="/store/esp8266-nodemcu">ESP8266 NodeMCU</a> | <a tabindex="-1" style="color:inherit;text-decoration:none" href="/categories/sensors">Sensors</a> | <a tabindex="-1" style="color:inherit;text-decoration:none" href="/store/ultrasonic-sensor">Ultrasonic Sensor</a> | <a tabindex="-1" style="color:inherit;text-decoration:none" href="/store">All Products</a></p></div><div style="border-top:1px solid #2e2e2e;margin-top:8px"><div class="py-5 flex flex-col md:flex-row items-center justify-between gap-3"><p class="text-xs text-center md:text-right" style="color:#555;white-space:nowrap">© <!-- -->2026<!-- --> ElectroGlobal. All rights reserved.</p></div></div></div></footer><section aria-label="Notifications alt+T" tabindex="-1" aria-live="polite" aria-relevant="additions text" aria-atomic="false"></section><nav class="md:hidden fixed bottom-0 left-0 right-0 z-40 bg-[#FAFAF4] border-t border-[#D8D8CC] shadow-[0_-2px_12px_rgba(0,0,0,0.06)] transition-transform duration-300 ease-in-out translate-y-0"><div class="flex items-center justify-around h-16 px-1"><div class="flex-1"><a class="flex w-full" href="/store"><div class="flex flex-col items-center justify-center gap-0.5 w-full py-1 transition-all duration-150"><div class="relative"><svg xmlns="http://www.w3.org/2000/svg" width="24" height="24" viewBox="0 0 24 24" fill="none" stroke="currentColor" stroke-width="1.8" stroke-linecap="round" stroke-linejoin="round" class="lucide lucide-store h-5 w-5 transition-colors duration-150 text-[#3a3a3a]" aria-hidden="true"><path d="M15 21v-5a1 1 0 0 0-1-1h-4a1 1 0 0 0-1 1v5"></path><path d="M17.774 10.31a1.12 1.12 0 0 0-1.549 0 2.5 2.5 0 0 1-3.451 0 1.12 1.12 0 0 0-1.548 0 2.5 2.5 0 0 1-3.452 0 1.12 1.12 0 0 0-1.549 0 2.5 2.5 0 0 1-3.77-3.248l2.889-4.184A2 2 0 0 1 7 2h10a2 2 0 0 1 1.653.873l2.895 4.192a2.5 2.5 0 0 1-3.774 3.244"></path><path d="M4 10.95V19a2 2 0 0 0 2 2h12a2 2 0 0 0 2-2v-8.05"></path></svg></div><span class="text-[10px] font-medium leading-none text-[#3a3a3a]">Shop</span></div></a></div><div class="flex-1"><a class="flex w-full" href="/categories"><div class="flex flex-col items-center justify-center gap-0.5 w-full py-1 transition-all duration-150"><div class="relative"><svg xmlns="http://www.w3.org/2000/svg" width="24" height="24" viewBox="0 0 24 24" fill="none" stroke="currentColor" stroke-width="1.8" stroke-linecap="round" stroke-linejoin="round" class="lucide lucide-layout-grid h-5 w-5 transition-colors duration-150 text-[#3a3a3a]" aria-hidden="true"><rect width="7" height="7" x="3" y="3" rx="1"></rect><rect width="7" height="7" x="14" y="3" rx="1"></rect><rect width="7" height="7" x="14" y="14" rx="1"></rect><rect width="7" height="7" x="3" y="14" rx="1"></rect></svg></div><span class="text-[10px] font-medium leading-none text-[#3a3a3a]">Category</span></div></a></div><div class="flex-1"><a href="https://wa.me/917231012223" target="_blank" rel="noopener noreferrer" class="flex w-full"><div class="flex flex-col items-center justify-center gap-0.5 w-full py-1 transition-all duration-150"><div class="relative"><img alt="WhatsApp" loading="lazy" width="20" height="20" decoding="async" data-nimg="1" class="object-contain" style="color:transparent" src="/wp.webp"/></div><span class="text-[10px] font-medium leading-none text-[#0BD318]">WhatsApp</span></div></a></div><div class="flex-1"><a href="http://RapidChip.electroglobal.in/" target="_blank" rel="noopener noreferrer" class="flex w-full"><div class="flex flex-col items-center justify-center gap-0.5 w-full py-1 transition-all duration-150"><div class="relative"><img alt="RapidChip" loading="lazy" width="25" height="25" decoding="async" data-nimg="1" class="object-contain size-7" style="color:transparent" src="/rapidchip.webp"/></div><span class="text-[10px] font-medium leading-none text-[#3a3a3a]">RapidChip</span></div></a></div><div class="flex-1"><button type="button" class="flex w-full"><div class="flex flex-col items-center justify-center gap-0.5 w-full py-1 transition-all duration-150"><div class="relative"><svg xmlns="http://www.w3.org/2000/svg" width="24" height="24" viewBox="0 0 24 24" fill="none" stroke="currentColor" stroke-width="1.8" stroke-linecap="round" stroke-linejoin="round" class="lucide lucide-shopping-bag h-5 w-5 transition-colors duration-150 text-[#3a3a3a]" aria-hidden="true"><path d="M16 10a4 4 0 0 1-8 0"></path><path d="M3.103 6.034h17.794"></path><path d="M3.4 5.467a2 2 0 0 0-.4 1.2V20a2 2 0 0 0 2 2h14a2 2 0 0 0 2-2V6.667a2 2 0 0 0-.4-1.2l-2-2.667A2 2 0 0 0 17 2H7a2 2 0 0 0-1.6.8z"></path></svg></div><span class="text-[10px] font-medium leading-none text-[#3a3a3a]">Bag</span></div></button></div></div><div class="h-safe-area-inset-bottom bg-[#FAFAF4]"></div></nav><!--$--><!--/$--><!--$--><!--/$--><script src="/_next/static/chunks/webpack-fe2ae892cc2f9e48.js" id="_R_" async=""></script><script>(self.__next_f=self.__next_f||[]).push([0])</script><script>self.__next_f.push([1,"1:\"$Sreact.fragment\"\n2:I[42593,[\"8500\",\"static/chunks/8500-91b6320178318d91.js\",\"8409\",\"static/chunks/8409-9d23a5336e2bf296.js\",\"7903\",\"static/chunks/7903-9c151b5ebf70308f.js\",\"6708\",\"static/chunks/6708-2e55ee45efaed84d.js\",\"8437\",\"static/chunks/8437-ecd45341762bc3a9.js\",\"7138\",\"static/chunks/7138-ced3e16c2d09c6bd.js\",\"5731\",\"static/chunks/5731-9d324577c4d3c9e5.js\",\"45\",\"static/chunks/45-9d02d6dce8870ce2.js\",\"3408\",\"static/chunks/3408-468bd4796646ad2f.js\",\"3911\",\"static/chunks/3911-73a27b79938baec7.js\",\"4425\",\"static/chunks/4425-09beaa3b36c42558.js\",\"9998\",\"static/chunks/9998-610bef2fb777d186.js\",\"2245\",\"static/chunks/2245-c6f45f9668935b37.js\",\"1498\",\"static/chunks/1498-9b50f5cac1dc7984.js\",\"7808\",\"static/chunks/7808-cf3edc283222fa07.js\",\"3929\",\"static/chunks/3929-41a5e57a5fc969a1.js\",\"7177\",\"static/chunks/app/layout-43e247891ac47c49.js\"],\"\"]\n4:I[81461,[\"8500\",\"static/chunks/8500-91b6320178318d91.js\",\"8409\",\"static/chunks/8409-9d23a5336e2bf296.js\",\"7903\",\"static/chunks/7903-9c151b5ebf70308f.js\",\"6708\",\"static/chunks/6708-2e55ee45efaed84d.js\",\"8437\",\"static/chunks/8437-ecd45341762bc3a9.js\",\"7138\",\"static/chunks/7138-ced3e16c2d09c6bd.js\",\"5731\",\"static/chunks/5731-9d324577c4d3c9e5.js\",\"45\",\"static/chunks/45-9d02d6dce8870ce2.js\",\"3408\",\"static/chunks/3408-468bd4796646ad2f.js\",\"3911\",\"static/chunks/3911-73a27b79938baec7.js\",\"4425\",\"static/chunks/4425-09beaa3b36c42558.js\",\"9998\",\"static/chunks/9998-610bef2fb777d186.js\",\"2245\",\"static/chunks/2245-c6f45f9668935b37.js\",\"1498\",\"static/chunks/1498-9b50f5cac1dc7984.js\",\"7808\",\"static/chunks/7808-cf3edc283222fa07.js\",\"3929\",\"static/chunks/3929-41a5e57a5fc969a1.js\",\"7177\",\"static/chunks/app/layout-43e247891ac47c49.js\"],\"default\"]\n5:I[48375,[\"8500\",\"static/chunks/8500-91b6320178318d91.js\",\"8409\",\"static/chunks/8409-9d23a5336e2bf296.js\",\"7903\",\"static/chunks/7903-9c151b5ebf70308f.js\",\"6708\",\"static/chunks/6708-2e55ee45efaed84d.js\",\"8437\",\"static/chunks/8437-ecd45341762bc3a9.js\",\"7138\",\"static/chunks/7138-ced3e16c2d09c6bd.js\",\"5731\",\"static/chunks/5731-9d324577c4d3c9e5.js\",\"45\",\"static/chunks/45-9d02d6dce8870ce2.js\",\"3408\",\"static/chunks/3408-468bd4796646ad2f.js\",\"3911\",\"static/chunks/3911-73a27b79938baec7.js\",\"4425\",\"static/chunks/4425-09beaa3b36c42558.js\",\"9998\",\"static/chunks/9998-610bef2fb777d186.js\",\"2245\",\"static/chunks/2245-c6f45f9668935b37.js\",\"1498\",\"static/chunks/1498-9b50f5cac1dc7984.js\",\"7808\",\"static/chunks/7808-cf3edc283222fa07.js\",\"3929\",\"static/chunks/3929-41a5e57a5fc969a1.js\",\"7177\",\"static/chunks/app/layout-43e247891ac47c49.js\"],\"AuthProvider\"]\n6:I[4600,[\"8500\",\"static/chunks/8500-91b6320178318d91.js\",\"8409\",\"static/chunks/8409-9d23a5336e2bf296.js\",\"7903\",\"static/chunks/7903-9c151b5ebf70308f.js\",\"6708\",\"static/chunks/6708-2e55ee45efaed84d.js\",\"8437\",\"static/chunks/8437-ecd45341762bc3a9.js\",\"7138\",\"static/chunks/7138-ced3e16c2d09c6bd.js\",\"5731\",\"static/chunks/5731-9d324577c4d3c9e5.js\",\"45\",\"static/chunks/45-9d02d6dce8870ce2.js\",\"3408\",\"static/chunks/3408-468bd4796646ad2f.js\",\"3911\",\"static/chunks/3911-73a27b79938baec7.js\",\"4425\",\"static/chunks/4425-09beaa3b36c42558.js\",\"9998\",\"static/chunks/9998-610bef2fb777d186.js\",\"2245\",\"static/chunks/2245-c6f45f9668935b37.js\",\"1498\",\"static/chunks/1498-9b50f5cac1dc7984.js\",\"7808\",\"static/chunks/7808-cf3edc283222fa07.js\",\"3929\",\"static/chunks/3929-41a5e57a5fc969a1.js\",\"7177\",\"static/chunks/app/layout-43e247891ac47c49.js\"],\"WishlistProvider\"]\n7:I[67479,[\"8500\",\"static/chunks/8500-91b6320178318d91.js\",\"8409\",\"static/chunks/8409-9d23a5336e2bf296.js\",\"7903\",\"static/chunks/7903-9c151b5ebf70308f.js\",\"6708\",\"static/chunks/6708-2e55ee45efaed84d.js\",\"8437\",\"static/chunks/8437-ecd45341762bc3a9.js\",\"7138\",\"static/chunks/7138-ced3e16c2d09c6bd.js\",\"5731\",\"static/chunks/5731-9d324577c4d3c9e5.js\",\"45\",\"static/chunks/45-9d02d6dce8870ce2.js\",\"3408\",\"static/chunks/3408-468bd4796646ad2f.js\",\"3911\",\"static/chunks/3911-73a27b79938baec7.js\",\"4425\",\"static/chunks/4425-09beaa3b36c42558.js\",\"9998\",\"static/chunks/9998-610bef2fb777d186.js\",\"2245\",\"static/chunks/2245-c6f45f9668935b37.js\",\"1498\",\"static/chunks/1498-9b50f5cac1dc7984.js\",\"7808\",\"static/chunks/7808"])</script><script>self.__next_f.push([1,"-cf3edc283222fa07.js\",\"3929\",\"static/chunks/3929-41a5e57a5fc969a1.js\",\"7177\",\"static/chunks/app/layout-43e247891ac47c49.js\"],\"CartProvider\"]\n8:I[42589,[\"8500\",\"static/chunks/8500-91b6320178318d91.js\",\"8409\",\"static/chunks/8409-9d23a5336e2bf296.js\",\"7903\",\"static/chunks/7903-9c151b5ebf70308f.js\",\"6708\",\"static/chunks/6708-2e55ee45efaed84d.js\",\"8437\",\"static/chunks/8437-ecd45341762bc3a9.js\",\"7138\",\"static/chunks/7138-ced3e16c2d09c6bd.js\",\"5731\",\"static/chunks/5731-9d324577c4d3c9e5.js\",\"45\",\"static/chunks/45-9d02d6dce8870ce2.js\",\"3408\",\"static/chunks/3408-468bd4796646ad2f.js\",\"3911\",\"static/chunks/3911-73a27b79938baec7.js\",\"4425\",\"static/chunks/4425-09beaa3b36c42558.js\",\"9998\",\"static/chunks/9998-610bef2fb777d186.js\",\"2245\",\"static/chunks/2245-c6f45f9668935b37.js\",\"1498\",\"static/chunks/1498-9b50f5cac1dc7984.js\",\"7808\",\"static/chunks/7808-cf3edc283222fa07.js\",\"3929\",\"static/chunks/3929-41a5e57a5fc969a1.js\",\"7177\",\"static/chunks/app/layout-43e247891ac47c49.js\"],\"Navbar\"]\n9:I[57121,[],\"\"]\na:I[74581,[],\"\"]\nb:I[5598,[\"8500\",\"static/chunks/8500-91b6320178318d91.js\",\"8409\",\"static/chunks/8409-9d23a5336e2bf296.js\",\"7903\",\"static/chunks/7903-9c151b5ebf70308f.js\",\"6708\",\"static/chunks/6708-2e55ee45efaed84d.js\",\"8437\",\"static/chunks/8437-ecd45341762bc3a9.js\",\"7138\",\"static/chunks/7138-ced3e16c2d09c6bd.js\",\"5731\",\"static/chunks/5731-9d324577c4d3c9e5.js\",\"45\",\"static/chunks/45-9d02d6dce8870ce2.js\",\"3408\",\"static/chunks/3408-468bd4796646ad2f.js\",\"3911\",\"static/chunks/3911-73a27b79938baec7.js\",\"4425\",\"static/chunks/4425-09beaa3b36c42558.js\",\"9998\",\"static/chunks/9998-610bef2fb777d186.js\",\"2245\",\"static/chunks/2245-c6f45f9668935b37.js\",\"1498\",\"static/chunks/1498-9b50f5cac1dc7984.js\",\"7808\",\"static/chunks/7808-cf3edc283222fa07.js\",\"3929\",\"static/chunks/3929-41a5e57a5fc969a1.js\",\"7177\",\"static/chunks/app/layout-43e247891ac47c49.js\"],\"Footer\"]\nc:I[25044,[\"8500\",\"static/chunks/8500-91b6320178318d91.js\",\"8409\",\"static/chunks/8409-9d23a5336e2bf296.js\",\"7903\",\"static/chunks/7903-9c151b5ebf70308f.js\",\"6708\",\"static/chunks/6708-2e55ee45efaed84d.js\",\"8437\",\"static/chunks/8437-ecd45341762bc3a9.js\",\"7138\",\"static/chunks/7138-ced3e16c2d09c6bd.js\",\"5731\",\"static/chunks/5731-9d324577c4d3c9e5.js\",\"45\",\"static/chunks/45-9d02d6dce8870ce2.js\",\"3408\",\"static/chunks/3408-468bd4796646ad2f.js\",\"3911\",\"static/chunks/3911-73a27b79938baec7.js\",\"4425\",\"static/chunks/4425-09beaa3b36c42558.js\",\"9998\",\"static/chunks/9998-610bef2fb777d186.js\",\"2245\",\"static/chunks/2245-c6f45f9668935b37.js\",\"1498\",\"static/chunks/1498-9b50f5cac1dc7984.js\",\"7808\",\"static/chunks/7808-cf3edc283222fa07.js\",\"3929\",\"static/chunks/3929-41a5e57a5fc969a1.js\",\"7177\",\"static/chunks/app/layout-43e247891ac47c49.js\"],\"Toaster\"]\nd:I[69644,[\"8500\",\"static/chunks/8500-91b6320178318d91.js\",\"8409\",\"static/chunks/8409-9d23a5336e2bf296.js\",\"7903\",\"static/chunks/7903-9c151b5ebf70308f.js\",\"6708\",\"static/chunks/6708-2e55ee45efaed84d.js\",\"8437\",\"static/chunks/8437-ecd45341762bc3a9.js\",\"7138\",\"static/chunks/7138-ced3e16c2d09c6bd.js\",\"5731\",\"static/chunks/5731-9d324577c4d3c9e5.js\",\"45\",\"static/chunks/45-9d02d6dce8870ce2.js\",\"3408\",\"static/chunks/3408-468bd4796646ad2f.js\",\"3911\",\"static/chunks/3911-73a27b79938baec7.js\",\"4425\",\"static/chunks/4425-09beaa3b36c42558.js\",\"9998\",\"static/chunks/9998-610bef2fb777d186.js\",\"2245\",\"static/chunks/2245-c6f45f9668935b37.js\",\"1498\",\"static/chunks/1498-9b50f5cac1dc7984.js\",\"7808\",\"static/chunks/7808-cf3edc283222fa07.js\",\"3929\",\"static/chunks/3929-41a5e57a5fc969a1.js\",\"7177\",\"static/chunks/app/layout-43e247891ac47c49.js\"],\"AuthPromptWrapper\"]\ne:I[56046,[\"8500\",\"static/chunks/8500-91b6320178318d91.js\",\"8409\",\"static/chunks/8409-9d23a5336e2bf296.js\",\"7903\",\"static/chunks/7903-9c151b5ebf70308f.js\",\"6708\",\"static/chunks/6708-2e55ee45efaed84d.js\",\"8437\",\"static/chunks/8437-ecd45341762bc3a9.js\",\"7138\",\"static/chunks/7138-ced3e16c2d09c6bd.js\",\"5731\",\"static/chunks/5731-9d324577c4d3c9e5.js\",\"45\",\"static/chunks/45-9d02d6dce8870ce2.js\",\"3408\",\"static/chunks/3408-468bd4796646ad2f.js\",\"3911\",\"static/chunks/3911-73a27b79938baec7.js\",\"4425\",\"static/chunks/4425-09beaa3b36c42558.js\",\"9998\",\"static/"])</script><script>self.__next_f.push([1,"chunks/9998-610bef2fb777d186.js\",\"2245\",\"static/chunks/2245-c6f45f9668935b37.js\",\"1498\",\"static/chunks/1498-9b50f5cac1dc7984.js\",\"7808\",\"static/chunks/7808-cf3edc283222fa07.js\",\"3929\",\"static/chunks/3929-41a5e57a5fc969a1.js\",\"7177\",\"static/chunks/app/layout-43e247891ac47c49.js\"],\"StickyFooter\"]\nf:\"$Sreact.suspense\"\n10:I[82477,[\"8500\",\"static/chunks/8500-91b6320178318d91.js\",\"8409\",\"static/chunks/8409-9d23a5336e2bf296.js\",\"7903\",\"static/chunks/7903-9c151b5ebf70308f.js\",\"6708\",\"static/chunks/6708-2e55ee45efaed84d.js\",\"8437\",\"static/chunks/8437-ecd45341762bc3a9.js\",\"7138\",\"static/chunks/7138-ced3e16c2d09c6bd.js\",\"5731\",\"static/chunks/5731-9d324577c4d3c9e5.js\",\"45\",\"static/chunks/45-9d02d6dce8870ce2.js\",\"3408\",\"static/chunks/3408-468bd4796646ad2f.js\",\"3911\",\"static/chunks/3911-73a27b79938baec7.js\",\"4425\",\"static/chunks/4425-09beaa3b36c42558.js\",\"9998\",\"static/chunks/9998-610bef2fb777d186.js\",\"2245\",\"static/chunks/2245-c6f45f9668935b37.js\",\"1498\",\"static/chunks/1498-9b50f5cac1dc7984.js\",\"7808\",\"static/chunks/7808-cf3edc283222fa07.js\",\"3929\",\"static/chunks/3929-41a5e57a5fc969a1.js\",\"7177\",\"static/chunks/app/layout-43e247891ac47c49.js\"],\"AuthRedirectHandler\"]\n11:I[21957,[\"8500\",\"static/chunks/8500-91b6320178318d91.js\",\"8437\",\"static/chunks/8437-ecd45341762bc3a9.js\",\"8156\",\"static/chunks/app/blogs/page-993273bfb6882546.js\"],\"PreloadChunks\"]\n12:I[89873,[\"8500\",\"static/chunks/8500-91b6320178318d91.js\",\"8409\",\"static/chunks/8409-9d23a5336e2bf296.js\",\"7903\",\"static/chunks/7903-9c151b5ebf70308f.js\",\"6708\",\"static/chunks/6708-2e55ee45efaed84d.js\",\"8437\",\"static/chunks/8437-ecd45341762bc3a9.js\",\"7138\",\"static/chunks/7138-ced3e16c2d09c6bd.js\",\"5731\",\"static/chunks/5731-9d324577c4d3c9e5.js\",\"45\",\"static/chunks/45-9d02d6dce8870ce2.js\",\"3408\",\"static/chunks/3408-468bd4796646ad2f.js\",\"3911\",\"static/chunks/3911-73a27b79938baec7.js\",\"4425\",\"static/chunks/4425-09beaa3b36c42558.js\",\"9998\",\"static/chunks/9998-610bef2fb777d186.js\",\"2245\",\"static/chunks/2245-c6f45f9668935b37.js\",\"1498\",\"static/chunks/1498-9b50f5cac1dc7984.js\",\"7808\",\"static/chunks/7808-cf3edc283222fa07.js\",\"3929\",\"static/chunks/3929-41a5e57a5fc969a1.js\",\"7177\",\"static/chunks/app/layout-43e247891ac47c49.js\"],\"default\"]\n13:I[34917,[\"8500\",\"static/chunks/8500-91b6320178318d91.js\",\"8409\",\"static/chunks/8409-9d23a5336e2bf296.js\",\"7903\",\"static/chunks/7903-9c151b5ebf70308f.js\",\"6708\",\"static/chunks/6708-2e55ee45efaed84d.js\",\"8437\",\"static/chunks/8437-ecd45341762bc3a9.js\",\"7138\",\"static/chunks/7138-ced3e16c2d09c6bd.js\",\"5731\",\"static/chunks/5731-9d324577c4d3c9e5.js\",\"45\",\"static/chunks/45-9d02d6dce8870ce2.js\",\"3408\",\"static/chunks/3408-468bd4796646ad2f.js\",\"3911\",\"static/chunks/3911-73a27b79938baec7.js\",\"4425\",\"static/chunks/4425-09beaa3b36c42558.js\",\"9998\",\"static/chunks/9998-610bef2fb777d186.js\",\"2245\",\"static/chunks/2245-c6f45f9668935b37.js\",\"1498\",\"static/chunks/1498-9b50f5cac1dc7984.js\",\"7808\",\"static/chunks/7808-cf3edc283222fa07.js\",\"3929\",\"static/chunks/3929-41a5e57a5fc969a1.js\",\"7177\",\"static/chunks/app/layout-43e247891ac47c49.js\"],\"SpeedInsights\"]\n15:I[90484,[],\"OutletBoundary\"]\n1b:I[26719,[\"4219\",\"static/chunks/app/global-error-669ac49f3b1919e2.js\"],\"default\"]\n1c:I[90484,[],\"ViewportBoundary\"]\n1e:I[90484,[],\"MetadataBoundary\"]\n:HL[\"/_next/static/media/22a5144ee8d83bca-s.p.woff2\",\"font\",{\"crossOrigin\":\"\",\"type\":\"font/woff2\"}]\n:HL[\"/_next/static/media/7d4881bb7e1bf84d-s.p.woff2\",\"font\",{\"crossOrigin\":\"\",\"type\":\"font/woff2\"}]\n:HL[\"/_next/static/media/904be59b21bd51cb-s.p.woff2\",\"font\",{\"crossOrigin\":\"\",\"type\":\"font/woff2\"}]\n:HL[\"/_next/static/css/3ca22a26df292859.css\",\"style\"]\n:HL[\"/_next/static/css/1f6198dd5c979da3.css\",\"style\"]\n3:[\"$\",\"iframe\",null,{\"src\":\"https://www.googletagmanager.com/ns.html?id=GTM-KPGJFMVJ\",\"height\":\"0\",\"width\":\"0\",\"style\":{\"display\":\"none\",\"visibility\":\"hidden\"}}]\n"])</script><script>self.__next_f.push([1,"0:{\"P\":null,\"b\":\"Q5cnQWLoYmzcIC3cU4bJl\",\"c\":[\"\",\"blogs\",\"7-surprising-arduino-uno-specifications\"],\"q\":\"\",\"i\":false,\"f\":[[[\"\",{\"children\":[\"blogs\",{\"children\":[[\"slug\",\"7-surprising-arduino-uno-specifications\",\"d\"],{\"children\":[\"__PAGE__\",{}]}]}]},\"$undefined\",\"$undefined\",true],[[\"$\",\"$1\",\"c\",{\"children\":[[[\"$\",\"link\",\"0\",{\"rel\":\"stylesheet\",\"href\":\"/_next/static/css/3ca22a26df292859.css\",\"precedence\":\"next\",\"crossOrigin\":\"$undefined\",\"nonce\":\"$undefined\"}],[\"$\",\"link\",\"1\",{\"rel\":\"stylesheet\",\"href\":\"/_next/static/css/1f6198dd5c979da3.css\",\"precedence\":\"next\",\"crossOrigin\":\"$undefined\",\"nonce\":\"$undefined\"}]],[\"$\",\"html\",null,{\"lang\":\"en\",\"children\":[[\"$\",\"head\",null,{\"children\":[[\"$\",\"meta\",null,{\"name\":\"msvalidate.01\",\"content\":\"8794E12886D77F6133E4823192730A02\"}],[\"$\",\"link\",null,{\"rel\":\"preconnect\",\"href\":\"https://electroglobal-products.s3.ap-south-1.amazonaws.com\"}],[\"$\",\"link\",null,{\"rel\":\"preconnect\",\"href\":\"https://api.electroglobal.in\"}]]}],[\"$\",\"body\",null,{\"className\":\"__variable_246ccd __variable_c29908 __variable_db6fbc antialiased ...\",\"children\":[[\"$\",\"$L2\",null,{\"id\":\"gtm-init\",\"strategy\":\"lazyOnload\",\"children\":\"\\n function loadGTM() {\\n (function(w,d,s,l,i){w[l]=w[l]||[];w[l].push({'gtm.start':\\n new Date().getTime(),event:'gtm.js'});var f=d.getElementsByTagName(s)[0],\\n j=d.createElement(s),dl=l!='dataLayer'?'\u0026l='+l:'';j.async=true;j.src=\\n 'https://www.googletagmanager.com/gtm.js?id='+i+dl;f.parentNode.insertBefore(j,f);\\n })(window,document,'script','dataLayer','GTM-KPGJFMVJ');\\n }\\n\\n // Load after first interaction — scroll, click, or touch\\n ['scroll','click','touchstart','keydown'].forEach(function(event) {\\n window.addEventListener(event, function handler() {\\n loadGTM();\\n ['scroll','click','touchstart','keydown'].forEach(function(e) {\\n window.removeEventListener(e, handler);\\n });\\n }, { once: true, passive: true });\\n });\\n\\n // Fallback — load after 5 seconds even with no interaction\\n setTimeout(loadGTM, 5000);\\n\"}],[\"$\",\"noscript\",null,{\"children\":\"$3\"}],[\"$\",\"$L4\",null,{\"children\":[\"$\",\"$L5\",null,{\"children\":[\"$\",\"$L6\",null,{\"children\":[\"$\",\"$L7\",null,{\"children\":[[\"$\",\"$L8\",null,{}],[\"$\",\"main\",null,{\"className\":\"flex-1 pb-16 md:pb-0 w-full\",\"children\":[\"$\",\"$L9\",null,{\"parallelRouterKey\":\"children\",\"error\":\"$undefined\",\"errorStyles\":\"$undefined\",\"errorScripts\":\"$undefined\",\"template\":[\"$\",\"$La\",null,{}],\"templateStyles\":\"$undefined\",\"templateScripts\":\"$undefined\",\"notFound\":[[[\"$\",\"title\",null,{\"children\":\"404: This page could not be found.\"}],[\"$\",\"div\",null,{\"style\":{\"fontFamily\":\"system-ui,\\\"Segoe UI\\\",Roboto,Helvetica,Arial,sans-serif,\\\"Apple Color Emoji\\\",\\\"Segoe UI Emoji\\\"\",\"height\":\"100vh\",\"textAlign\":\"center\",\"display\":\"flex\",\"flexDirection\":\"column\",\"alignItems\":\"center\",\"justifyContent\":\"center\"},\"children\":[\"$\",\"div\",null,{\"children\":[[\"$\",\"style\",null,{\"dangerouslySetInnerHTML\":{\"__html\":\"body{color:#000;background:#fff;margin:0}.next-error-h1{border-right:1px solid rgba(0,0,0,.3)}@media (prefers-color-scheme:dark){body{color:#fff;background:#000}.next-error-h1{border-right:1px solid rgba(255,255,255,.3)}}\"}}],[\"$\",\"h1\",null,{\"className\":\"next-error-h1\",\"style\":{\"display\":\"inline-block\",\"margin\":\"0 20px 0 0\",\"padding\":\"0 23px 0 0\",\"fontSize\":24,\"fontWeight\":500,\"verticalAlign\":\"top\",\"lineHeight\":\"49px\"},\"children\":404}],[\"$\",\"div\",null,{\"style\":{\"display\":\"inline-block\"},\"children\":[\"$\",\"h2\",null,{\"style\":{\"fontSize\":14,\"fontWeight\":400,\"lineHeight\":\"49px\",\"margin\":0},\"children\":\"This page could not be found.\"}]}]]}]}]],[]],\"forbidden\":\"$undefined\",\"unauthorized\":\"$undefined\"}]}],[\"$\",\"$Lb\",null,{}],[\"$\",\"$Lc\",null,{}],[\"$\",\"$Ld\",null,{}],[\"$\",\"$Le\",null,{}],[\"$\",\"$f\",null,{\"fallback\":null,\"children\":[\"$\",\"$L10\",null,{}]}],[[\"$\",\"$L11\",null,{\"moduleIds\":[\"app/layout.tsx -\u003e @/components/common/PopupManager\"]}],[\"$\",\"$L12\",null,{}]]]}]}]}]}],[\"$\",\"$L13\",null,{}]]}]]}]]}],{\"children\":[[\"$\",\"$1\",\"c\",{\"children\":[null,[\"$\",\"$L9\",null,{\"parallelRouterKey\":\"children\",\"error\":\"$undefined\",\"errorStyles\":\"$undefined\",\"errorScripts\":\"$undefined\",\"template\":[\"$\",\"$La\",null,{}],\"templateStyles\":\"$undefined\",\"templateScripts\":\"$undefined\",\"notFound\":\"$undefined\",\"forbidden\":\"$undefined\",\"unauthorized\":\"$undefined\"}]]}],{\"children\":[[\"$\",\"$1\",\"c\",{\"children\":[null,[\"$\",\"$L9\",null,{\"parallelRouterKey\":\"children\",\"error\":\"$undefined\",\"errorStyles\":\"$undefined\",\"errorScripts\":\"$undefined\",\"template\":[\"$\",\"$La\",null,{}],\"templateStyles\":\"$undefined\",\"templateScripts\":\"$undefined\",\"notFound\":\"$undefined\",\"forbidden\":\"$undefined\",\"unauthorized\":\"$undefined\"}]]}],{\"children\":[[\"$\",\"$1\",\"c\",{\"children\":[\"$L14\",null,[\"$\",\"$L15\",null,{\"children\":[\"$\",\"$f\",null,{\"name\":\"Next.MetadataOutlet\",\"children\":\"$@16\"}]}]]}],{},null,false,false]},null,false,false]},null,false,false]},null,false,false],[\"$\",\"$1\",\"h\",{\"children\":[\"$L17\",\"$L18\",\"$L19\",\"$L1a\"]}],false]],\"m\":\"$undefined\",\"G\":[\"$1b\",[]],\"S\":false}\n"])</script><script>self.__next_f.push([1,"17:null\n18:[\"$\",\"$L1c\",null,{\"children\":\"$@1d\"}]\n19:[\"$\",\"div\",null,{\"hidden\":true,\"children\":[\"$\",\"$L1e\",null,{\"children\":[\"$\",\"$f\",null,{\"name\":\"Next.Metadata\",\"children\":\"$@1f\"}]}]}]\n1a:[\"$\",\"meta\",null,{\"name\":\"next-size-adjust\",\"content\":\"\"}]\n1d:[[\"$\",\"meta\",\"0\",{\"charSet\":\"utf-8\"}],[\"$\",\"meta\",\"1\",{\"name\":\"viewport\",\"content\":\"width=device-width, initial-scale=1\"}]]\n"])</script><script>self.__next_f.push([1,"20:I[86869,[],\"IconMark\"]\n"])</script><script>self.__next_f.push([1,"1f:[[\"$\",\"title\",\"0\",{\"children\":\"7 Surprising Arduino Uno Specifications | ElectroGlobal\"}],[\"$\",\"meta\",\"1\",{\"name\":\"description\",\"content\":\"Discover 7 surprising Arduino Uno specifications and learn how obstacle-avoiding cars can create a safer world. Free shipping in India!\"}],[\"$\",\"meta\",\"2\",{\"name\":\"keywords\",\"content\":\"arduino, arduino uno specifications, robotics, arduino, arduino uno specifications, robotics\"}],[\"$\",\"link\",\"3\",{\"rel\":\"canonical\",\"href\":\"https://electroglobal.in/blogs/7-surprising-arduino-uno-specifications\"}],[\"$\",\"meta\",\"4\",{\"property\":\"og:title\",\"content\":\"Discover 7 Surprising Arduino Uno Specs!\"}],[\"$\",\"meta\",\"5\",{\"property\":\"og:description\",\"content\":\"Explore the unique specifications of Arduino Uno and how they contribute to obstacle-avoiding cars for a safer future. Join the tech revolution!\"}],[\"$\",\"meta\",\"6\",{\"property\":\"og:url\",\"content\":\"https://electroglobal.in/blogs/7-surprising-arduino-uno-specifications\"}],[\"$\",\"meta\",\"7\",{\"property\":\"og:image\",\"content\":\"https://electroglobal-products.s3.ap-south-1.amazonaws.com/blog/7-surprising-arduino-uno-specifications-img-1-1780212519075.webp\"}],[\"$\",\"meta\",\"8\",{\"property\":\"og:image:width\",\"content\":\"1200\"}],[\"$\",\"meta\",\"9\",{\"property\":\"og:image:height\",\"content\":\"630\"}],[\"$\",\"meta\",\"10\",{\"property\":\"og:image:alt\",\"content\":\"7 Surprising Arduino Uno Specifications | ElectroGlobal\"}],[\"$\",\"meta\",\"11\",{\"name\":\"twitter:card\",\"content\":\"summary_large_image\"}],[\"$\",\"meta\",\"12\",{\"name\":\"twitter:title\",\"content\":\"Discover 7 Surprising Arduino Uno Specs!\"}],[\"$\",\"meta\",\"13\",{\"name\":\"twitter:description\",\"content\":\"Explore the unique specifications of Arduino Uno and how they contribute to obstacle-avoiding cars for a safer future. Join the tech revolution!\"}],[\"$\",\"meta\",\"14\",{\"name\":\"twitter:image\",\"content\":\"https://electroglobal-products.s3.ap-south-1.amazonaws.com/blog/7-surprising-arduino-uno-specifications-img-1-1780212519075.webp\"}],[\"$\",\"link\",\"15\",{\"rel\":\"shortcut icon\",\"href\":\"/faviconnn.ico\"}],[\"$\",\"link\",\"16\",{\"rel\":\"icon\",\"href\":\"/favicon.ico?603d046c9a6fdfbb\",\"type\":\"image/x-icon\",\"sizes\":\"16x16\"}],[\"$\",\"link\",\"17\",{\"rel\":\"icon\",\"href\":\"/faviconnn.ico\"}],[\"$\",\"link\",\"18\",{\"rel\":\"apple-touch-icon\",\"href\":\"/faviconnn.ico\"}],[\"$\",\"$L20\",\"19\",{}]]\n"])</script><script>self.__next_f.push([1,"16:null\n"])</script><script>self.__next_f.push([1,"21:I[98500,[\"8500\",\"static/chunks/8500-91b6320178318d91.js\",\"8437\",\"static/chunks/8437-ecd45341762bc3a9.js\",\"3744\",\"static/chunks/app/blogs/%5Bslug%5D/page-3975f077a3f99a9a.js\"],\"\"]\n22:I[38437,[\"8500\",\"static/chunks/8500-91b6320178318d91.js\",\"8437\",\"static/chunks/8437-ecd45341762bc3a9.js\",\"3744\",\"static/chunks/app/blogs/%5Bslug%5D/page-3975f077a3f99a9a.js\"],\"Image\"]\n"])</script><script>self.__next_f.push([1,"14:[\"$\",\"div\",null,{\"className\":\"min-h-screen bg-background\",\"children\":[[\"$\",\"script\",null,{\"type\":\"application/ld+json\",\"dangerouslySetInnerHTML\":{\"__html\":\"{\\\"@context\\\":\\\"https://schema.org\\\",\\\"@type\\\":\\\"BlogPosting\\\",\\\"headline\\\":\\\"7 Surprising Arduino Uno Specifications | ElectroGlobal\\\",\\\"image\\\":\\\"https://electroglobal-products.s3.ap-south-1.amazonaws.com/blog/7-surprising-arduino-uno-specifications-img-1-1780212519075.webp\\\",\\\"datePublished\\\":\\\"2024-10-01T11:11:22.000Z\\\",\\\"dateModified\\\":\\\"2026-07-01T00:07:12.480Z\\\",\\\"author\\\":{\\\"@type\\\":\\\"Person\\\",\\\"name\\\":\\\"rajdarra\\\"},\\\"description\\\":\\\"Discover 7 surprising Arduino Uno specifications and learn how obstacle-avoiding cars can create a safer world. Free shipping in India!\\\",\\\"keywords\\\":\\\"Arduino Uno specifications, obstacle-avoiding cars, Arduino projects, electronic components, safety technology, Arduino, electronic components, innovation, technology, safety\\\",\\\"url\\\":\\\"https://electroglobal.in/blogs/7-surprising-arduino-uno-specifications\\\",\\\"mainEntityOfPage\\\":{\\\"@type\\\":\\\"WebPage\\\",\\\"@id\\\":\\\"https://electroglobal.in/blogs/7-surprising-arduino-uno-specifications\\\"},\\\"timeRequired\\\":\\\"PT21M\\\"}\"}}],[\"$\",\"div\",null,{\"className\":\"max-w-7xl mx-auto px-4 py-8\",\"children\":[[\"$\",\"nav\",null,{\"className\":\"flex items-center gap-2 text-xs text-muted-foreground mb-8\",\"children\":[[\"$\",\"$L21\",null,{\"href\":\"/\",\"className\":\"hover:text-primary transition-colors\",\"children\":\"Home\"}],[\"$\",\"span\",null,{\"children\":\"/\"}],[\"$\",\"$L21\",null,{\"href\":\"/blogs\",\"className\":\"hover:text-primary transition-colors\",\"children\":\"Blog\"}],[\"$\",\"span\",null,{\"children\":\"/\"}],[\"$\",\"span\",null,{\"className\":\"text-foreground font-semibold line-clamp-1 max-w-xs\",\"children\":\"7 Surprising Arduino Uno Specifications You Can't Ignore and Obstacle-Avoiding Cars: Roadmap to a Safer World\"}]]}],[\"$\",\"div\",null,{\"className\":\"flex gap-8 items-start\",\"children\":[[\"$\",\"main\",null,{\"className\":\"flex-1 min-w-0\",\"children\":[[\"$\",\"h1\",null,{\"className\":\"text-3xl md:text-4xl font-black leading-tight text-foreground mb-4\",\"children\":\"7 Surprising Arduino Uno Specifications You Can't Ignore and Obstacle-Avoiding Cars: Roadmap to a Safer World\"}],[\"$\",\"div\",null,{\"className\":\"flex flex-wrap items-center gap-4 mb-6 pb-6 border-b border-border\",\"children\":[\"$undefined\",[\"$\",\"div\",null,{\"className\":\"flex items-center gap-1.5 text-xs text-muted-foreground\",\"children\":[[\"$\",\"svg\",null,{\"className\":\"h-3.5 w-3.5\",\"fill\":\"none\",\"viewBox\":\"0 0 24 24\",\"stroke\":\"currentColor\",\"children\":[\"$\",\"path\",null,{\"strokeLinecap\":\"round\",\"strokeLinejoin\":\"round\",\"strokeWidth\":2,\"d\":\"M8 7V3m8 4V3m-9 8h10M5 21h14a2 2 0 002-2V7a2 2 0 00-2-2H5a2 2 0 00-2 2v12a2 2 0 002 2z\"}]}],\"1 October 2024\"]}],[\"$\",\"div\",null,{\"className\":\"flex items-center gap-1.5 text-xs text-muted-foreground\",\"children\":[[\"$\",\"svg\",null,{\"className\":\"h-3.5 w-3.5\",\"fill\":\"none\",\"viewBox\":\"0 0 24 24\",\"stroke\":\"currentColor\",\"children\":[\"$\",\"path\",null,{\"strokeLinecap\":\"round\",\"strokeLinejoin\":\"round\",\"strokeWidth\":2,\"d\":\"M12 8v4l3 3m6-3a9 9 0 11-18 0 9 9 0 0118 0z\"}]}],\"21 min read\"]}]]}],[\"$\",\"div\",null,{\"className\":\"relative rounded-2xl border-l-4 border-primary bg-primary/5 px-6 py-4 mb-8\",\"children\":[\"$\",\"p\",null,{\"className\":\"text-sm font-semibold text-foreground/80 leading-relaxed italic\",\"children\":\"Discover the 7 surprising Arduino Uno specifications that can elevate your projects and learn how these insights contribute to the development of obstacle-avoiding cars, making our roads safer. Dive into this essential guide and unlock the potential of your Arduino Uno for innovative solutions!\"}]}],[\"$\",\"div\",null,{\"className\":\"rounded-2xl overflow-hidden mb-8 border border-border relative h-72 md:h-96\",\"children\":[\"$\",\"$L22\",null,{\"src\":\"https://electroglobal-products.s3.ap-south-1.amazonaws.com/blog/7-surprising-arduino-uno-specifications-img-1-1780212519075.webp\",\"alt\":\"7 Surprising Arduino Uno Specifications You Can't Ignore and Obstacle-Avoiding Cars: Roadmap to a Safer World\",\"fill\":true,\"className\":\"object-cover\"}]}],\"$L23\",\"$L24\",\"$undefined\",\"$L25\",\"$L26\",\"$L27\"]}],\"$L28\"]}]]}]]}]\n"])</script><script>self.__next_f.push([1,"2a:I[76073,[\"8500\",\"static/chunks/8500-91b6320178318d91.js\",\"8437\",\"static/chunks/8437-ecd45341762bc3a9.js\",\"3744\",\"static/chunks/app/blogs/%5Bslug%5D/page-3975f077a3f99a9a.js\"],\"TagCarousel\"]\n2c:I[12740,[\"8500\",\"static/chunks/8500-91b6320178318d91.js\",\"8437\",\"static/chunks/8437-ecd45341762bc3a9.js\",\"3744\",\"static/chunks/app/blogs/%5Bslug%5D/page-3975f077a3f99a9a.js\"],\"CopyLinkButton\"]\n29:T807f,"])</script><script>self.__next_f.push([1,"\u003ch4\u003e\nTable of Contents \u003c/h4\u003e\n\u003csvg aria-hidden=\"true\" viewBox=\"0 0 448 512\" xmlns=\"http://www.w3.org/2000/svg\"\u003e\u003cpath d=\"M207.029 381.476L12.686 187.132c-9.373-9.373-9.373-24.569 0-33.941l22.667-22.667c9.357-9.357 24.522-9.375 33.901-.04L224 284.505l154.745-154.021c9.379-9.335 24.544-9.317 33.901.04l22.667 22.667c9.373 9.373 9.373 24.569 0 33.941L240.971 381.476c-9.373 9.372-24.569 9.372-33.942 0z\"\u003e\u003c/path\u003e\u003c/svg\u003e\n\u003csvg aria-hidden=\"true\" viewBox=\"0 0 448 512\" xmlns=\"http://www.w3.org/2000/svg\"\u003e\u003cpath d=\"M240.971 130.524l194.343 194.343c9.373 9.373 9.373 24.569 0 33.941l-22.667 22.667c-9.357 9.357-24.522 9.375-33.901.04L224 227.495 69.255 381.516c-9.379 9.335-24.544 9.317-33.901-.04l-22.667-22.667c-9.373-9.373-9.373-24.569 0-33.941L207.03 130.525c9.372-9.373 24.568-9.373 33.941-.001z\"\u003e\u003c/path\u003e\u003c/svg\u003e\n\u003csvg aria-hidden=\"true\" viewBox=\"0 0 1000 1000\" xmlns=\"http://www.w3.org/2000/svg\"\u003e\u003cpath d=\"M500 975V858C696 858 858 696 858 500S696 142 500 142 142 304 142 500H25C25 237 238 25 500 25S975 237 975 500 763 975 500 975Z\"\u003e\u003c/path\u003e\u003c/svg\u003e\n\n\u003cp\u003eThis is important in robotics, especially for autonomous vehicles which we require to navigate on their own. The application commonly found in this domain is the Arduino uno specifications based \u003ca href=\"https://electroglobal.in/our-collections/\" target=\"_blank\" rel=\"noopener\"\u003eobstacle avoiding car \u003c/a\u003ethat detects obstacles with ultrasonic sensors and avoids it using servo motors. The ease of which they are able to explore environments without collisions, these cars are perfect for tasks such as surveillance or remote monitoring. Although this project uses the \u003ca title=\"Arduino Uno\" href=\"https://electroglobalapp-cqdmdme5gpd0amd5.centralindia-01.azurewebsites.net/arduino-uno-r3-atmega328p-arduino-compatible-dip-without-cable/\"\u003eArduino Uno\u003c/a\u003e, the car can be made from a Arduino Nano based on size requirements and power availability.\u003c/p\u003e\n\n\u003ch2\u003eProject Overview\u003c/h2\u003e\n\n\u003cp\u003eIn this detailed tutorial on how to build an \u003ca href=\"https://electroglobal.in/obstacle-avoiding-robo-kit/\" target=\"_blank\" rel=\"noopener\"\u003eobstacle avoiding car \u003c/a\u003eusing an Arduino Uno! Arduino Cost Our car is smarter at avoiding obstacles as we use a servo mounted ultrasonic sensor and thus can detect the obstacles not only in the front but also on sides simultaneously. An L298N DC motor driver will allow the four geared motors hooked to the wheels to be powered by this car as well. The frame and assembly of the car for this guide requires the use of a standard Arduino car kit.\u003c/p\u003e\n\n\u003cfigure\u003e\u003cimg src=\"https://electroglobal-products.s3.ap-south-1.amazonaws.com/blog/7-surprising-arduino-uno-specifications-content-1-1773145288647-1780212524045.webp\" alt=\"arduino uno specifications \" /\u003e\u003c/figure\u003e\n\n\u003ch3\u003eArduino Uno: Specifications\u003c/h3\u003e\n\n\u003cp\u003eOk, before we start digging into it, let’s take a look at the Arduino Uno specs that make it perfect for this project. The Arduino Uno comes equipped with:\u003c/p\u003e\n\n\u003cul\u003e\n\u003cli\u003e6 PWM outputs (from 14 digital I/O pins).\u003c/li\u003e\n\u003c/ul\u003e\n\n\u003cul\u003e\n\u003cli\u003e6 Analog Inputs,\u003c/li\u003e\n\u003c/ul\u003e\n\n\u003cul\u003e\n\u003cli\u003eA clock speed of 16 MHz,\u003c/li\u003e\n\u003c/ul\u003e\n\n\u003cul\u003e\n\u003cli\u003e32 KB Flash memory to store (code)\u003c/li\u003e\n\u003c/ul\u003e\n\n\u003cul\u003e\n\u003cli\u003eAn ATmega328P microcontroller powered it.\u003c/li\u003e\n\u003c/ul\u003e\n\n\u003cp\u003eThis means the Arduino Uno is powerful enough to track multiple inputs and outputs at once, something that is necessary for receiving signals from sensors, motors, LED’s, etc. in this obstacle avoiding car project.\u003c/p\u003e\n\n\u003cp\u003e\u003cstrong\u003eComponents Required\u003c/strong\u003e\u003c/p\u003e\n\n\u003cul\u003e\n\n\u003c/ul\u003e\n\u003cul\u003e\n\u003cli\u003eTo get started, you will need the following components:\u003c/li\u003e\n\u003c/ul\u003e\n\n\u003cul\u003e\n\u003cli\u003eYou will need Arduino Uno or Arduino Nano (What you prefer).\u003c/li\u003e\n\u003c/ul\u003e\n\n\u003cul\u003e\n\u003cli\u003e1x MG90 Metal Gear Servo Motor\u003c/li\u003e\n\u003c/ul\u003e\n\n\u003cul\u003e\n\u003cli\u003eHC-SR04 Ultrasonic Sensor,\u003c/li\u003e\n\u003c/ul\u003e\n\n\u003cul\u003e\n\u003cli\u003eRGB LEDs (3x),\u003c/li\u003e\n\u003c/ul\u003e\n\n\u003cul\u003e\n\u003cli\u003eL298N Motor Driver,\u003c/li\u003e\n\u003c/ul\u003e\n\n\u003cul\u003e\n\u003cli\u003eLaser cut chassis 2WD Arduino Car Kit.\u003c/li\u003e\n\u003c/ul\u003e\n\n\u003cul\u003e\n\u003cli\u003e12V Li-ion Battery,\u003c/li\u003e\n\u003c/ul\u003e\n\n\u003cul\u003e\n\u003cli\u003eLM2596 DC-DC Buck Converter,\u003c/li\u003e\n\u003c/ul\u003e\n\n\u003cul\u003e\n\u003cli\u003eSwitch,\u003c/li\u003e\n\u003c/ul\u003e\n\n\u003cul\u003e\n\u003cli\u003eJumper Wires,\u003c/li\u003e\n\u003c/ul\u003e\n\n\u003cul\u003e\n\u003cli\u003eBreadboard or PCB,\u003c/li\u003e\n\u003c/ul\u003e\n\n\u003cul\u003e\n\u003cli\u003eScrews, Nuts, and Spacers.\u003c/li\u003e\n\u003c/ul\u003e\n\n\u003cul\u003e\n\u003cli\u003eWorking Principle of the Car\u003c/li\u003e\n\u003c/ul\u003e\n\n\u003cul\u003e\n\u003cli\u003eThe HC-SR04 Ultrasonic Sensor is the heart of the obstacle-avoiding car. How This Sensor Works: It emits ultrasonic sound waves at 40 kHz. If these waves hit an obstacle, they bounce back and the sensor will notice them. The Arduino works out how far away the car is from the obstacle by measuring how long it takes for the echo to come back. The Arduino turns the motors one way or another depending on the readings.\u003c/li\u003e\n\u003c/ul\u003e\n\n\u003ch2\u003eBUILDING Obstacle Avoiding Car\u003c/h2\u003e\n\n\u003ch3\u003eStep 1: Assembling the Car Kit\u003c/h3\u003e\n\n\u003cp\u003eTo build the body of your robot, you can use any off the shelf robotic car kit. These kits generally include a chassis, wheels, together with a mounting bracket for the electronic components. For this project, we've picked a more car like kit with front bumper, spoilers, etc. Projects such as a Human Following Robot and Pick and Place Arduino Robot Car used similar kits for your interest.\u003c/p\u003e\n\n\u003ch3\u003eStep 2: Circuit Diagram\u003c/h3\u003e\n\n\u003cp\u003eYou need a carefully planned circuit for the project. An ultrasonic sensor is mounted on a servo motor such that directional measurements are allowed. The sensor sweeps from side to side, detecting objects ahead of and to the side of the car.\u003cbr /\u003e\u003cstrong\u003eServo Motor Connection\u003c/strong\u003e\u003cbr /\u003eTo connect the servo motor, plug the signal of the servo motor to any PWM pin on the Arduino Uno. The first being that you connect the power wire to the 5V output from the DC-DC converter and the ground wire to one of the Arduino’s GND pins.\u003cbr /\u003e\u003cstrong\u003eUltrasonic Sensor Connection\u003c/strong\u003e\u003cbr /\u003eThen connect sensor VCC pin to 5V pin on Arduino, GND pin to ground and TRIG to digital pin 2 and ECHO to digital pin 4. By this point, the ultrasonic sensor is connected to the Arduino, so it can read distance from the sensor and process the data.\u003cbr /\u003e\u003cstrong\u003eRGB LEDs Connection\u003cbr /\u003e\u003c/strong\u003eThreading the RGB LED cathode (ground) of each of the LEDs to a common ground rail on the breadboard. Then connect A1, A2, and A3 to the LED’s red terminal, and digital pins 5, 6, and 13 to the green terminal. The advantage of this configuration is you can have the Arduino control the color of the RGB LEDs as you need.\u003cbr /\u003e\u003cstrong\u003eL298N Motor Driver Connection\u003c/strong\u003e\u003cbr /\u003eThe L298N motor driver is what lets us control the motor of the car. Connect the breadboard’s positive rail to Arduino’s Vin and the breadboard’s ground rail to Arduino’s ground. Second, connect the 5V output from the LM2596 to the positive rail and the LM2596 ground to the ground rail. L298N’s IN1 and IN2 for the first motor needs to be connected to Arduino pins 7 and 8. Now to connect to the second motor, connect IN3 and IN4 to pins 12 and 11. Lastely connect L298N’s ENA and ENB pins to the Arduino PWM pins 9 and 10, enabling the independent control of each motor.\u003cbr /\u003e\u003cstrong\u003ePower Connections\u003c/strong\u003e\u003cbr /\u003eThe positive terminal from 12V Li-ion battery is connected to the LM2596’s Vin input and negative terminal is connected to the ground rail of breadboard. Connect the battery’s positive terminal to L298N motor driver’s 12V input and the battery’s negative terminal to L298N’s ground pin as well.\u003cbr /\u003e\u003cstrong\u003eAdditional Enhancements\u003c/strong\u003e\u003cbr /\u003eAdditional features you could add, in order to improve the car's design, include a power switch, a DC charging socket and a Li-ion battery level indicator. Coming from the back of the car is this indicator, featuring a slider switch that allows you to check the battery status without the need to power on the whole system. When you charge the battery, the switch goes into the 'up' position.\u003c/p\u003e\n\n\u003ch3\u003eArduino Uno Specifications: Why The Project Is Perfect for It?\u003c/h3\u003e\n\n\u003cp\u003eIn this project, Arduino Uno is a popular choice with its easy to use ATmega328P microcontroller and an easy to configure pin. Its specifications include:\u003cbr /\u003eInput voltage rang of 7–12V, operating voltage of 5V.\u003cbr /\u003eEnough flash memory to hold multiple lines of code, \u003cem\u003e32 KB,\u003c/em\u003e is provided.\u003cbr /\u003eWe have 6 analog inputs with 10 bits of resolution which is ideal for reading sensor data,\u003cbr /\u003e14 digital I/O pins of which 6 can provide PWM output to control motors and LEDs.\u003cbr /\u003eA 16 MHz clock speed for responsible sensor data processing.\u003c/p\u003e\n\n\u003ch3\u003e\u003cstrong\u003eFinal Steps and Precautions\u003c/strong\u003e\u003c/h3\u003e\n\n\u003cp\u003eScrew, nut and spacer all components to the car frame. Secure all connections so that short circuits do not occur. First, before powering on the circuit, double check the connection and you will confirm that it’s arduino power switch off.\u003c/p\u003e\n\n\u003ch3\u003eConclusion and Code\u003c/h3\u003e\n\n\u003cp\u003eAfter you have made your Arduino based obstacle avoiding car, upload the code to the Arduino Uno. Here the HC-SR04 sensor is set up to find distances and output signals to the motor pins according to those distances. You can customize the code based on your needs, e.g. modify the threshold distance and adjust the speed control of the motor.\u003cbr /\u003eFor this project, the Arduino Uno’s specifications are perfect, as it has a number of features available that make it more versatile with connection and controls. Now that everything is in order, your obstacle avoiding car is equipped to explore autonomously, without bumping into obstacles!\u003c/p\u003e\n\n\u003cpre\u003e\u003ccode\u003einclude\nThis block includes the Servo library, which is necessary for controlling the servo motor.\n// Ultrasonic sensor pins\ndefine trig 2\ndefine echo 4\n// RGB led pins\ndefine LR 9 // Led Right\ndefine LC 13 // Led Center\ndefine LL 10 // Led Left\ndefine LRR A3 // Led Right Red\ndefine LCR A2 // Led Center Red\ndefine LLR A1 // Led Left Red\nIn this block, various pin constants are defined for components such as the Ultrasonic sensor and RGB LEDs. These constants are used to specify which pins on the Arduino are connected to each component.\n\u003c/code\u003e\u003c/pre\u003e\n\n\u003cpre\u003e\u003ccode\u003e// Motor control pins\ndefine LEFT_MOTOR_PIN1 8\ndefine LEFT_MOTOR_PIN2 7\ndefine RIGHT_MOTOR_PIN1 12\ndefine RIGHT_MOTOR_PIN2 11\ndefine ENA 6 // Enable A pin for motor speed control\ndefine ENB 3 // Enable B pin for motor speed control\n// Distance thresholds for obstacle detection\ndefine MIN_DISTANCE_BACK 12\nThis block defines threshold values. MIN_DISTANCE_BACK represents the minimum distance required from an obstacle to stop.\nvoid setup() {\n// Set motor control pins as outputs\npinMode(LEFT_MOTOR_PIN1, OUTPUT);\npinMode(LEFT_MOTOR_PIN2, OUTPUT);\npinMode(RIGHT_MOTOR_PIN1, OUTPUT);\npinMode(RIGHT_MOTOR_PIN2, OUTPUT);\npinMode(ENA, OUTPUT);\npinMode(ENB, OUTPUT);\npinMode(LR, OUTPUT);\npinMode(LC, OUTPUT);\npinMode(LL, OUTPUT);\npinMode(LRR, OUTPUT);\npinMode(LCR, OUTPUT);\npinMode(LLR, OUTPUT);\ndigitalWrite(LR, LOW);\ndigitalWrite(LC, LOW);\ndigitalWrite(LL, LOW);\nanalogWrite(LRR, 0);\nanalogWrite(LCR, 0);\nanalogWrite(LLR, 0);\nservoLook.attach(5);\n//Set the Trig pins as output pins\npinMode(trig, OUTPUT);\n//Set the Echo pins as input pins\npinMode(echo, INPUT);\nanalogWrite(ENA, 53.5); // speed for motor A 0-LOW speed, 255-Full speed\nanalogWrite(ENB, 45); // speed for motor B\n// Initialize the serial communication for debugging\nSerial.begin(9600);\n}\nIn the setup() function, various initializations take place. This includes configuring motor control pins, LED pins, and sensor pins as either OUTPUT or INPUT. It also sets the initial states for LEDs and RGB LEDs to LOW or 0. Additionally, the Servo motor is attached to pin 5, motor speed is adjusted using analogWrite() for ENA and ENB, and serial communication is initiated for debugging (though this part is optional).\nvoid loop()\n{\nservoLook.write(90);\ndelay(750);\nint distance = getDistance();\nif (distance \u003e= MIN_DISTANCE_BACK)\n{\nmoveForward();\nSerial.println(\"forward\"); }\nwhile(distance \u003e= MIN_DISTANCE_BACK)\n{\ndistance = getDistance();\ndelay(50);\n}\nStop();\nint turnDir = checkDirection();\nSerial.println(turnDir);\nswitch(turnDir)\n{\ncase 0: //Turn left\nSerial.println(\"Left\");\nturnLeft();\ndelay(425);\nStop();\nbreak;\ncase 2: //Turn right\nSerial.println(\"Right\");\nturnRight();\ndelay(415);\nStop();\nbreak;\ncase 3: //move forward\nSerial.println(\"Forward\");\nmoveForward();\nbreak;\n}\n}\u003c/code\u003e\u003c/pre\u003e\n\n\u003cp\u003eThese lines define digital pins of Arduino (pin7,pin8,pin12 and pin11) for the L298N motor driver inputs to control the DC motors. The pins in1 and in2 control one motor, and the pins in3 and in4 control the other motor. Ena and Enb control the speed of the motor.\u003c/p\u003e\n\u003cp\u003eThis is the main loop of the code, executed continuously. The servo motor is set to look straight ahead, and there's a delay for it to settle. The getDistance() function is used to measure the distance using the Ultrasonic sensor. If the measured distance is greater than or equal to MIN_DISTANCE_BACK, the robot is instructed to move forward. While the distance is above the threshold, it continues moving forward. When the distance becomes less than MIN_DISTANCE_BACK, the Stop() function is called to stop the robot.The checkDirection() function is used to determine if there's an obstacle in the left, right, or front direction. Based on the detected direction, the robot will turn left, turn right, or move forward. Serial messages are printed to help with debugging.\u003c/p\u003e\n\n\u003cpre\u003e\u003ccode\u003eint getDistance() //Measure the distance to an object{\nunsigned long pulseTime; //Create a variable to store the pulse travel time\nint distance; //Create a variable to store the calculated distance\ndigitalWrite(trig, HIGH); //Generate a 10 microsecond pulse\ndelayMicroseconds(10);\ndigitalWrite(trig, LOW);\npulseTime = pulseIn(echo, HIGH); //Measure the time for the pulse to return\ndistance = pulseTime / 29 / 2; //Calculate the object distance based on the\npulse time\nSerial.println(distance);\nreturn distance;\nThis function measures the distance to an object using the Ultrasonic sensor. It generates a trigger pulse and measures the time for the pulse to return. Calculate and returns the distance based on the measured time.\nint checkDirection() //Check the left,Front and right directions and decide which way to turn\nint distances [3] = {0,0,0}; //Left ,right and Front distances\nint turnDir; //Direction to turn, 0 left, 1 turn around, 2 right, 3 forward\nservoLook.write(180); //Turn servo to look left\ndelay(500);\ndistances [0] = getDistance(); //Get the left object distance\nservoLook.write(90); //Turn servo to look front\ndelay(500);\ndistances [3] = getDistance(); //Get the front object distance\nservoLook.write(0); //Turn servo to look right\ndelay(1000);\ndistances [1] = getDistance(); //Get the right object distance\nif (distances[0]\u003c=25 \u0026\u0026 distances[1]\u003c=25) //If both directions are blocked, move forward turnDir = 3; else if (distances[0]\u003e=distances[1]) //If left has more space, turn left\nturnDir = 0; //left\nelse if (distances[0]\u003cdistances[1]) //If right has more space, turn right\nturnDir = 2; //right\n//else if (distances[0]\u003c=50 \u0026\u0026 distances[1]\u003c=50 \u0026\u0026 distances[3]\u003c=50) //If All directions are blocked, turn around\n//turnDir = 1;\nreturn turnDir;\n}\u003c/code\u003e\u003c/pre\u003e\n\n\u003cp\u003eThis section of the code handles the obstacle-avoidance strategy for the car's movement. It continually monitors obstacle distances in three directions left, right, and front by utilizing a servo motor. After each scan, it calculates the distances to nearby obstacles. If both the left and right directions have close obstacles, the car proceeds forward. If there's more space on the left side, it steers the car left, and if the right side is more open, it directs the car to the right. If all three directions (front, left, and right) have obstructions nearby, the car is instructed to perform a U-turn. These directions are communicated by returning specific values: 0 for left, 2 for right, 3 for forward, and 1 for turning around.\u003c/p\u003e\n\n\u003cpre\u003e\u003ccode\u003einclude\nThis block includes the Servo library, which is necessary for controlling the servo motor.\n// Ultrasonic sensor pins\ndefine trig 2\ndefine echo 4\n// RGB led pins\ndefine LR 9 // Led Right\ndefine LC 13 // Led Center\ndefine LL 10 // Led Left\ndefine LRR A3 // Led Right Red\ndefine LCR A2 // Led Center Red\ndefine LLR A1 // Led Left Red\nIn this block, various pin constants are defined for components such as the Ultrasonic sensor and RGB LEDs. These constants are used to specify which pins on the Arduino are connected to each component.\n// Motor control pins\ndefine LEFT_MOTOR_PIN1 8\ndefine LEFT_MOTOR_PIN2 7\ndefine RIGHT_MOTOR_PIN1 12\ndefine RIGHT_MOTOR_PIN2 11\ndefine ENA 6 // Enable A pin for motor speed control\ndefine ENB 3 // Enable B pin for motor speed control\nThese lines define digital pins of Arduino (pin7,pin8,pin12 and pin11) for the L298N motor driver inputs to control the DC motors. The pins in1 and in2 control one motor, and the pins in3 and in4 control the other motor. Ena and Enb control the speed of the motor.\n// Distance thresholds for obstacle detection\ndefine MIN_DISTANCE_BACK 12\nThis block defines threshold values. MIN_DISTANCE_BACK represents the minimum distance required from an obstacle to stop.\nvoid setup() {\n// Set motor control pins as outputs\npinMode(LEFT_MOTOR_PIN1, OUTPUT);\npinMode(LEFT_MOTOR_PIN2, OUTPUT);\npinMode(RIGHT_MOTOR_PIN1, OUTPUT);\npinMode(RIGHT_MOTOR_PIN2, OUTPUT);\npinMode(ENA, OUTPUT);\npinMode(ENB, OUTPUT);\npinMode(LR, OUTPUT);\npinMode(LC, OUTPUT);\npinMode(LL, OUTPUT);\npinMode(LRR, OUTPUT);\npinMode(LCR, OUTPUT);\npinMode(LLR, OUTPUT);\ndigitalWrite(LR, LOW);\ndigitalWrite(LC, LOW);\ndigitalWrite(LL, LOW);\nanalogWrite(LRR, 0);\nanalogWrite(LCR, 0);\nanalogWrite(LLR, 0);\nservoLook.attach(5);\n//Set the Trig pins as output pins\npinMode(trig, OUTPUT);\n//Set the Echo pins as input pins\npinMode(echo, INPUT);\nanalogWrite(ENA, 53.5); // speed for motor A 0-LOW speed, 255-Full speed\nanalogWrite(ENB, 45); // speed for motor B\n// Initialize the serial communication for debugging\nSerial.begin(9600);\n}\nIn the setup() function, various initializations take place. This includes configuring motor control pins, LED pins, and sensor pins as either OUTPUT or INPUT. It also sets the initial states for LEDs and RGB LEDs to LOW or 0. Additionally, the Servo motor is attached to pin 5, motor speed is adjusted using analogWrite() for ENA and ENB, and serial communication is initiated for debugging (though this part is optional).\nvoid loop()\n{\nservoLook.write(90);\ndelay(750);\nint distance = getDistance();\nif (distance \u003e= MIN_DISTANCE_BACK)\n{\nmoveForward();\nSerial.println(\"forward\"); }\nwhile(distance \u003e= MIN_DISTANCE_BACK)\n{\ndistance = getDistance();\ndelay(50);\n}\nStop();\nint turnDir = checkDirection();\nSerial.println(turnDir);\nswitch(turnDir)\n{\ncase 0: //Turn left\nSerial.println(\"Left\");\nturnLeft();\ndelay(425);\nStop();\nbreak;\ncase 2: //Turn right\nSerial.println(\"Right\");\nturnRight();\ndelay(415);\nStop();\nbreak;\ncase 3: //move forward\nSerial.println(\"Forward\");\nmoveForward();\nbreak;\n}\n}\u003c/code\u003e\u003c/pre\u003e\n\n\u003cp\u003eThis is the main loop of the code, executed continuously. The servo motor is set to look straight ahead, and there's a delay for it to settle. The getDistance() function is used to measure the distance using the Ultrasonic sensor. If the measured distance is greater than or equal to MIN_DISTANCE_BACK, the robot is instructed to move forward. While the distance is above the threshold, it continues moving forward. When the distance becomes less than MIN_DISTANCE_BACK, the Stop() function is called to stop the robot.The checkDirection() function is used to determine if there's an obstacle in the left, right, or front direction.Based on the detected direction, the robot will turn left, turn right, or move forward.Serial messages are printed to help with debugging.\u003c/p\u003e\n\n\u003cpre\u003e\u003ccode\u003e\nint getDistance() //Measure the distance to an object{\nunsigned long pulseTime; //Create a variable to store the pulse travel time\nint distance; //Create a variable to store the calculated distance\ndigitalWrite(trig, HIGH); //Generate a 10 microsecond pulse\ndelayMicroseconds(10);\ndigitalWrite(trig, LOW);\npulseTime = pulseIn(echo, HIGH); //Measure the time for the pulse to return\ndistance = pulseTime / 29 / 2; //Calculate the object distance based on the\npulse time\nSerial.println(distance);\nreturn distance;\u003c/code\u003e\u003c/pre\u003e\n\n\u003cp\u003eThis function measures the distance to an object using the Ultrasonic sensor. It generates a trigger pulse and measures the time for the pulse to return. Calculate and returns the distance based on the measured time.\u003c/p\u003e\n\n\u003cpre\u003e\u003ccode\u003e\nint checkDirection() //Check the left,Front and right directions and decide which way to turn\nint distances [3] = {0,0,0}; //Left ,right and Front distances\nint turnDir; //Direction to turn, 0 left, 1 turn around, 2 right, 3 forward\nservoLook.write(180); //Turn servo to look left\ndelay(500);\ndistances [0] = getDistance(); //Get the left object distance\nservoLook.write(90); //Turn servo to look front\ndelay(500);\ndistances [3] = getDistance(); //Get the front object distance\nservoLook.write(0); //Turn servo to look right\ndelay(1000);\ndistances [1] = getDistance(); //Get the right object distance\nif (distances[0]\u003c=25 \u0026\u0026 distances[1]\u003c=25) //If both directions are blocked, move forward turnDir = 3; else if (distances[0]\u003e=distances[1]) //If left has more space, turn left\nturnDir = 0; //left\nelse if (distances[0]\u003cdistances[1]) //If right has more space, turn right\nturnDir = 2; //right\n//else if (distances[0]\u003c=50 \u0026\u0026 distances[1]\u003c=50 \u0026\u0026 distances[3]\u003c=50) //If All directions are blocked, turn around\n//turnDir = 1;\nreturn turnDir;\n}\nThis section of the code handles the obstacle-avoidance strategy for the car's movement. It continually monitors obstacle distances in three directions left, right, and front by utilizing a servo motor. After each scan, it calculates the distances to nearby obstacles. If both the left and right directions have close obstacles, the car proceeds forward. If there's more space on the left side, it steers the car left, and if the right side is more open, it directs the car to the right. If all three directions (front, left, and right) have obstructions nearby, the car is instructed to perform a U-turn. These directions are communicated by returning specific values: 0 for left, 2 for right, 3 for forward, and 1 for turning around.\n// Motor control functions\nvoid moveForward() {\nanalogWrite(ENA, 60.5); // speed for motor A\nanalogWrite(ENB, 52); // speed for motor B\ndigitalWrite(LR, HIGH);\ndigitalWrite(LC, HIGH); // All Green light turn on\ndigitalWrite(LL, HIGH);\nanalogWrite(LRR, 0);\nanalogWrite(LCR, 0); // All Red light turn off\nanalogWrite(LLR, 0);\ndigitalWrite(LEFT_MOTOR_PIN1, LOW);\ndigitalWrite(LEFT_MOTOR_PIN2, HIGH);\ndigitalWrite(RIGHT_MOTOR_PIN1, LOW);\ndigitalWrite(RIGHT_MOTOR_PIN2, HIGH);\n}\u003c/code\u003e\u003c/pre\u003e\n\n\u003cpre\u003e\u003ccode\u003evoid moveBackward() {\u003cbr /\u003edigitalWrite(LR, LOW);\u003cbr /\u003edigitalWrite(LC, LOW); // All Green light turn off\u003cbr /\u003edigitalWrite(LL, LOW);\u003cbr /\u003eanalogWrite(LRR, 255);\u003cbr /\u003eanalogWrite(LCR, 255); // All Red light turn on\u003cbr /\u003eanalogWrite(LLR, 255);\u003cbr /\u003edigitalWrite(LEFT_MOTOR_PIN1, HIGH);\u003cbr /\u003edigitalWrite(LEFT_MOTOR_PIN2, LOW);\u003cbr /\u003edigitalWrite(RIGHT_MOTOR_PIN1, HIGH);\u003cbr /\u003edigitalWrite(RIGHT_MOTOR_PIN2, LOW);\u003cbr /\u003e}\u003c/code\u003e\u003c/pre\u003e\n\n\u003cpre\u003e\u003ccode\u003e\u003c/code\u003e\u003c/pre\u003e\n\n\u003cp\u003evoid turnRight() {\u003cbr /\u003eanalogWrite(ENA, 100); // speed for motor A\u003cbr /\u003eanalogWrite(ENB, 90); // speed for motor B\u003cbr /\u003edigitalWrite(LR, HIGH);\u003cbr /\u003edigitalWrite(LC, LOW); // right side Green light turn on\u003cbr /\u003edigitalWrite(LL, LOW);\u003cbr /\u003eanalogWrite(LRR, 0);\u003cbr /\u003eanalogWrite(LCR, 255); // Left and Middle Red light turn on\u003cbr /\u003eanalogWrite(LLR, 255);\u003cbr /\u003edigitalWrite(LEFT_MOTOR_PIN1, HIGH);\u003cbr /\u003edigitalWrite(LEFT_MOTOR_PIN2, LOW);\u003cbr /\u003edigitalWrite(RIGHT_MOTOR_PIN1, LOW);\u003cbr /\u003edigitalWrite(RIGHT_MOTOR_PIN2, HIGH);\u003cbr /\u003e}\u003c/p\u003e\n\n\u003cp\u003evoid turnLeft() {\u003cbr /\u003eanalogWrite(ENA, 100); // speed for motor A\u003cbr /\u003eanalogWrite(ENB, 90); // speed for motor B\u003cbr /\u003edigitalWrite(LR, LOW);\u003cbr /\u003edigitalWrite(LC, LOW); // left side Green light turn on\u003cbr /\u003edigitalWrite(LL, HIGH);\u003cbr /\u003eanalogWrite(LRR, 255);\u003cbr /\u003eanalogWrite(LCR, 255); // right and Middle Red light turn on\u003cbr /\u003eanalogWrite(LLR, 0);\u003cbr /\u003edigitalWrite(LEFT_MOTOR_PIN1, LOW);\u003cbr /\u003edigitalWrite(LEFT_MOTOR_PIN2, HIGH);\u003cbr /\u003edigitalWrite(RIGHT_MOTOR_PIN1, HIGH);\u003cbr /\u003edigitalWrite(RIGHT_MOTOR_PIN2, LOW);\u003cbr /\u003e}\u003c/p\u003e\n\n\u003cp\u003evoid Stop() {\u003cbr /\u003eanalogWrite(ENA, 0); // speed for motor A\u003cbr /\u003eanalogWrite(ENB, 0); // speed for motor B\u003cbr /\u003edigitalWrite(LR, LOW);\u003cbr /\u003edigitalWrite(LC, LOW);\u003cbr /\u003edigitalWrite(LL, LOW);\u003cbr /\u003eanalogWrite(LRR, 255);\u003cbr /\u003eanalogWrite(LCR, 255);\u003cbr /\u003eanalogWrite(LLR, 255);\u003cbr /\u003eanalogWrite(ENA, 0); // speed for motor A\u003cbr /\u003eanalogWrite(ENB, 0); // speed for motor B\u003cbr /\u003edigitalWrite(LEFT_MOTOR_PIN1, LOW);\u003cbr /\u003edigitalWrite(LEFT_MOTOR_PIN2, LOW);\u003cbr /\u003edigitalWrite(RIGHT_MOTOR_PIN1, LOW);\u003cbr /\u003edigitalWrite(RIGHT_MOTOR_PIN2, LOW);\u003c/p\u003e\u003cp\u003e\u003cstrong\u003eThe 2WD Obstacle-Avoiding Car: Control Functions\u003c/strong\u003e\u003cbr /\u003eSpecific functions that move and determine the direction of the car depending on detected obstacles form the core of the Arduino based obstacle avoiding car.\u003cbr /\u003emoveForward(): This function lets the robot move forward by setting motors of both to move. The green lights are lit when going forward, and red are not lit.\u003cbr /\u003emoveBackward(): This function activates the red lights while the motor speeds are updated to move the car backward when the car needs to move backward. The switches are turned off so the lights on the green save image.\u003cbr /\u003eturnRight(): Appropriately changing the motor speed makes this function turn the car to the right. While the other lights are red, it turns on the right – side green light to indicate a right turn.\u003cbr /\u003eturnLeft(): This function adjusts the motor speed for turning left, and turns the left-side green light green, and the others red to show the car has turned left.\u003cbr /\u003eStop(): This function will bring the car to a halt, by turning off all lights and set their motor speeds to zero.\u003cbr /\u003eThe Obstacle avoiding Car, how it works\u003cbr /\u003eThe HC SR04 Ultrasonic Sensor is the primary component behind the car’s obstacle detection using sound waves to determine how far is the car from the nearby objects. Due to its affordable cost and its size, the sensor is effective for projects that require sensitivity to distance.\u003cbr /\u003eThe project consists of six essential components: I was also using the Arduino obstacle avoiding 2WD kit, Arduino Uno, an ultrasonic sensor, DC motors, servo motor, and an L298N motor driver. When powered on, the servo motor starts rotating to measure distances in three directions: left, right, and front. Wherever you have more space, the car decides where it’s going.\u003cbr /\u003eFor example, the Arduino Uno is pre programmed with a threshold distance that a robot will react when it is reached. Ultrasound used to detect objects closer than this distance and if it does it signals the Arduino which then commands the motor driver for STOP. The car turns in whatever direction has been determined by the servo motor to be the best direction after the servo motor re scans the surrounding area. This repeats and the car autonomously navigates without hitting obstacles.\u003cbr /\u003eRGB LEDs provide Visual Feedback.\u003cbr /\u003eTo provide visual cues for movement, three RGB LEDs are mounted on the car's underside:\u003cbr /\u003eRed LEDs indicate a stop.\u003cbr /\u003eThe car forward is lit by Green LED.\u003cbr /\u003eWhen right or left, the right or left side LED turns green and all others turn red.\u003c/p\u003e\u003ch2\u003eSummary and Applications\u003c/h2\u003e\n\n\u003cp\u003eAn autonomous obstacle avoiding car using Arduino Uno is successfully demonstrated in this project. It comprises an ultrasonic sensor for measuring the distance, a servo motor for scanning the surrounding, and an L298N motor driver for controlling car motors. This car demonstrates important concepts of autonomous robotics, and can additionally be used as a practical beginner level educational project. This project has such wide possibilities for expansion and adaptation as far as extending to delivery robots or warehouse management systems.\u003cbr /\u003eOnce enthusiasts have a good understanding of these basics, (they) will be able to make more advanced projects in robotics and electronics easily. If you like what you see, feel free to explore some of our other robotic projects we’ve built in the past for other inspiring ideas.\u003c/p\u003e\n\u003cpre\u003e\n\u003ccode readonly=\"true\"\u003e\n\u003cxmp\u003e//Arduino Obstacle Avoiding Car Code\n//by ElectroGlobal\n#include \u003cServo.h\u003e\n// Ultrasonic sensor pins\n#define trig 2\n#define echo 4\n// RGB led pins\n#define LR 9 // Led Right\n#define LC 13 // Led Center\n#define LL 10 // Led Left\n#define LRR A3 // Led Right Red\n#define LCR A2 // Led Center Red\n#define LLR A1 // Led Left Red\n// Motor control pins\n#define LEFT_MOTOR_PIN1 8\n#define LEFT_MOTOR_PIN2 7\n#define RIGHT_MOTOR_PIN1 12\n#define RIGHT_MOTOR_PIN2 11\n#define ENA 6 // Enable A pin for motor speed control\n#define ENB 3 // Enable B pin for motor speed control\n// Distance thresholds for obstacle detection\n//#define MAX_DISTANCE 80\n#define MIN_DISTANCE_BACK 12\n//float timeOut = 2*(MAX_DISTANCE+10)/100/340*1000000;\n// Maximum and minimum motor speeds\n#define MAX_SPEED 100\n#define MIN_SPEED 75\nServo servoLook;\nvoid setup() {\n// Set motor control pins as outputs\npinMode(LEFT_MOTOR_PIN1, OUTPUT);\npinMode(LEFT_MOTOR_PIN2, OUTPUT);\npinMode(RIGHT_MOTOR_PIN1, OUTPUT);\npinMode(RIGHT_MOTOR_PIN2, OUTPUT);\npinMode(ENA, OUTPUT);\npinMode(ENB, OUTPUT);\npinMode(LR, OUTPUT);\npinMode(LC, OUTPUT);\npinMode(LL, OUTPUT);\npinMode(LRR, OUTPUT);\npinMode(LCR, OUTPUT);\npinMode(LLR, OUTPUT);\ndigitalWrite(LR, LOW);\ndigitalWrite(LC, LOW);\ndigitalWrite(LL, LOW);\nanalogWrite(LRR, 0);\nanalogWrite(LCR, 0);\nanalogWrite(LLR, 0);\nservoLook.attach(5);\n//Set the Trig pins as output pins\npinMode(trig, OUTPUT);\n//Set the Echo pins as input pins\npinMode(echo, INPUT);\nanalogWrite(ENA, 53.5); // speed for motor A 0-LOW speed, 255-Full speed\nanalogWrite(ENB, 45); // speed for motor B\n// Initialize the serial communication for debugging\nSerial.begin(9600);\n}\nvoid loop() {\nservoLook.write(90);\ndelay(750);\nint distance = getDistance();\nif (distance \u003e= MIN_DISTANCE_BACK) {\nmoveForward();\nSerial.println(\"forward\");\n}\nwhile(distance \u003e= MIN_DISTANCE_BACK)\n{\ndistance = getDistance();\ndelay(50);\n}\nStop();\nint turnDir = checkDirection();\nSerial.println(turnDir);\nswitch(turnDir)\n{\ncase 0: //Turn left\nSerial.println(\"Left\");\nturnLeft();\ndelay(425);\nStop();\nbreak;\ncase 2: //Turn right\nSerial.println(\"Right\");\nturnRight();\ndelay(415);\nStop();\nbreak;\ncase 3: //move forward\nSerial.println(\"Forward\");\nmoveForward();\nbreak;\n}\n}\nint getDistance() //Measure the distance to an object\n{\nunsigned long pulseTime; //Create a variable to store the pulse travel time\nint distance; //Create a variable to store the calculated distance\ndigitalWrite(trig, HIGH); //Generate a 10 microsecond pulse\ndelayMicroseconds(10);\ndigitalWrite(trig, LOW);\npulseTime = pulseIn(echo, HIGH); //Measure the time for the pulse to return\ndistance = pulseTime / 29 / 2; //Calculate the object distance based on the pulse time\nSerial.println(distance);\nreturn distance;\n}\nint checkDirection() //Check the left and right directions and decide which way to turn\n{\nint distances [3] = {0,0,0}; //Left ,right and Front distances\nint turnDir; //Direction to turn, 0 left, 1 turn around, 2 right, 3 forward\nservoLook.write(180); //Turn servo to look left\ndelay(500);\ndistances [0] = getDistance(); //Get the left object distance\nservoLook.write(90); //Turn servo to look left\ndelay(500);\ndistances [3] = getDistance();\nservoLook.write(0); //Turn servo to look right\ndelay(1000);\ndistances [1] = getDistance(); //Get the right object distance\nif (distances[0]\u003c=25 \u0026\u0026 distances[1]\u003c=25) //If both directions are blocked, move forward\nturnDir = 3;\nelse if (distances[0]\u003e=distances[1]) //If left has more space, turn left\nturnDir = 0; //left\nelse if (distances[0]\u003cdistances[1]) //If right has more space, turn right\nturnDir = 2; //right\n//else if (distances[0]\u003c=50 \u0026\u0026 distances[1]\u003c=50 \u0026\u0026 distances[3]\u003c=50) //If All directions are blocked, turn around\n//turnDir = 1;\nreturn turnDir;\n}\n// Motor control functions\nvoid moveForward() {\nanalogWrite(ENA, 60.5); // speed for motor A\nanalogWrite(ENB, 52); // speed for motor B\ndigitalWrite(LR, HIGH);\ndigitalWrite(LC, HIGH); // All Green light turn on\ndigitalWrite(LL, HIGH);\nanalogWrite(LRR, 0);\nanalogWrite(LCR, 0); // All Red light turn off\nanalogWrite(LLR, 0);\ndigitalWrite(LEFT_MOTOR_PIN1, LOW);\ndigitalWrite(LEFT_MOTOR_PIN2, HIGH);\ndigitalWrite(RIGHT_MOTOR_PIN1, LOW);\ndigitalWrite(RIGHT_MOTOR_PIN2, HIGH);\n}\nvoid moveBackward() {\ndigitalWrite(LR, LOW);\ndigitalWrite(LC, LOW); // All Green light turn off\ndigitalWrite(LL, LOW);\nanalogWrite(LRR, 255);\nanalogWrite(LCR, 255); // All Red light turn on\nanalogWrite(LLR, 255);\ndigitalWrite(LEFT_MOTOR_PIN1, HIGH);\ndigitalWrite(LEFT_MOTOR_PIN2, LOW);\ndigitalWrite(RIGHT_MOTOR_PIN1, HIGH);\ndigitalWrite(RIGHT_MOTOR_PIN2, LOW);\n}\nvoid turnRight() {\nanalogWrite(E"])</script><script>self.__next_f.push([1,"23:[\"$\",\"div\",null,{\"className\":\"max-w-none [\u0026_h2]:font-black [\u0026_h2]:text-foreground [\u0026_p]:text-foreground/80 [\u0026_p]:leading-relaxed [\u0026_p]:mb-4 [\u0026_a]:text-primary [\u0026_a]:font-semibold [\u0026_strong]:text-foreground [\u0026_strong]:font-black [\u0026_ul]:my-4 [\u0026_ol]:my-4 [\u0026_li]:text-foreground/80 [\u0026_li]:leading-relaxed [\u0026_img]:rounded-2xl [\u0026_img]:border [\u0026_img]:border-border [\u0026_code]:bg-muted [\u0026_code]:px-1.5 [\u0026_code]:py-0.5 [\u0026_code]:rounded-md [\u0026_code]:text-primary [\u0026_code]:text-sm [\u0026_pre]:bg-muted [\u0026_pre]:rounded-2xl [\u0026_pre]:border [\u0026_pre]:border-border [\u0026_table]:rounded-xl [\u0026_table]:overflow-hidden [\u0026_th]:bg-muted [\u0026_th]:text-foreground [\u0026_th]:font-black\",\"dangerouslySetInnerHTML\":{\"__html\":\"$29\"}}]\n24:[\"$\",\"div\",null,{\"className\":\"mt-12 pt-6 border-t border-border\",\"children\":[[\"$\",\"p\",null,{\"className\":\"text-[10px] font-black uppercase tracking-widest text-muted-foreground mb-3\",\"children\":\"Tagged\"}],[\"$\",\"$L2a\",null,{\"tags\":[\"arduino\",\"arduino uno specifications\",\"robotics\"]}]]}]\n2b:T450,M17.472 14.382c-.297-.149-1.758-.867-2.03-.967-.273-.099-.471-.148-.67.15-.197.297-.767.966-.94 1.164-.173.199-.347.223-.644.075-.297-.15-1.255-.463-2.39-1.475-.883-.788-1.48-1.761-1.653-2.059-.173-.297-.018-.458.13-.606.134-.133.298-.347.446-.52.149-.174.198-.298.298-.497.099-.198.05-.371-.025-.52-.075-.149-.669-1.612-.916-2.207-.242-.579-.487-.5-.669-.51-.173-.008-.371-.01-.57-.01-.198 0-.52.074-.792.372-.272.297-1.04 1.016-1.04 2.479 0 1.462 1.065 2.875 1.213 3.074.149.198 2.096 3.2 5.077 4.487.709.306 1.262.489 1.694.625.712.227 1.36.195 1.871.118.571-.085 1.758-.719 2.006-1.413.248-.694.248-1.289.173-1.413-.074-.124-.272-.198-.57-.347m-5.421 7.403h-.004a9.87 9.87 0 01-5.031-1.378l-.361-.214-3.741.982.998-3.648-.235-.374a9.86 9.86 0 01-1.51-5.26c.001-5.45 4.436-9.884 9.888-9.884 2.64 0 5.122 1.03 6.988 2.898a9.825 9.825 0 012.893 6.994c-.003 5.45-4.437 9.884-9.885 9.884m8.413-18.297A11.815 11.815 0 0012.05 0C5.495 0 .16 5.335.157 11.892c0 2.096.547 4.142 1.588 5.945L.057 24l6.305-1.654a11.882 11.882 0 005.683 1.448h.005c6.554 0 11.89-5.335 11.893-11.893a11.821 11.821 0 00-3.48-8.413z"])</script><script>self.__next_f.push([1,"25:[\"$\",\"div\",null,{\"className\":\"mt-8 pt-6 border-t border-border flex items-center gap-3\",\"children\":[[\"$\",\"p\",null,{\"className\":\"text-[10px] font-black uppercase tracking-widest text-muted-foreground\",\"children\":\"Share\"}],[\"$\",\"a\",null,{\"href\":\"https://twitter.com/intent/tweet?text=7%20Surprising%20Arduino%20Uno%20Specifications%20You%20Can't%20Ignore%20and%20Obstacle-Avoiding%20Cars%3A%20Roadmap%20to%20a%20Safer%20World\u0026url=https%3A%2F%2Felectroglobal.in%2Fblogs%2F7-surprising-arduino-uno-specifications\",\"target\":\"_blank\",\"rel\":\"noopener noreferrer\",\"className\":\"h-8 w-8 rounded-full border border-border flex items-center justify-center text-muted-foreground hover:text-primary hover:border-primary/40 transition-colors\",\"children\":[\"$\",\"svg\",null,{\"className\":\"h-3.5 w-3.5\",\"fill\":\"currentColor\",\"viewBox\":\"0 0 24 24\",\"children\":[\"$\",\"path\",null,{\"d\":\"M18.244 2.25h3.308l-7.227 8.26 8.502 11.24H16.17l-4.714-6.231-5.401 6.231H2.741l7.73-8.835L1.254 2.25H8.08l4.259 5.622zm-1.161 17.52h1.833L7.084 4.126H5.117z\"}]}]}],[\"$\",\"a\",null,{\"href\":\"https://wa.me/?text=7%20Surprising%20Arduino%20Uno%20Specifications%20You%20Can't%20Ignore%20and%20Obstacle-Avoiding%20Cars%3A%20Roadmap%20to%20a%20Safer%20World%20https%3A%2F%2Felectroglobal.in%2Fblogs%2F7-surprising-arduino-uno-specifications\",\"target\":\"_blank\",\"rel\":\"noopener noreferrer\",\"className\":\"h-8 w-8 rounded-full border border-border flex items-center justify-center text-muted-foreground hover:text-green-600 hover:border-green-300 transition-colors\",\"children\":[\"$\",\"svg\",null,{\"className\":\"h-3.5 w-3.5\",\"fill\":\"currentColor\",\"viewBox\":\"0 0 24 24\",\"children\":[\"$\",\"path\",null,{\"d\":\"$2b\"}]}]}],[\"$\",\"$L2c\",null,{\"slug\":\"7-surprising-arduino-uno-specifications\"}]]}]\n"])</script><script>self.__next_f.push([1,"27:[\"$\",\"div\",null,{\"className\":\"mt-10\",\"children\":[\"$\",\"$L21\",null,{\"href\":\"/blogs\",\"className\":\"inline-flex items-center gap-2 px-5 py-2.5 rounded-2xl border border-border text-sm font-bold text-muted-foreground hover:text-primary hover:border-primary/40 transition-all group\",\"children\":[[\"$\",\"svg\",null,{\"className\":\"h-4 w-4 group-hover:-translate-x-0.5 transition-transform\",\"fill\":\"none\",\"viewBox\":\"0 0 24 24\",\"stroke\":\"currentColor\",\"children\":[\"$\",\"path\",null,{\"strokeLinecap\":\"round\",\"strokeLinejoin\":\"round\",\"strokeWidth\":2,\"d\":\"M15 19l-7-7 7-7\"}]}],\"Back to Blog\"]}]}]\n"])</script><script>self.__next_f.push([1,"28:[\"$\",\"aside\",null,{\"className\":\"hidden lg:flex flex-col gap-5 w-72 shrink-0\",\"children\":[[\"$\",\"div\",null,{\"className\":\"rounded-2xl border border-border bg-card overflow-hidden\",\"children\":[[\"$\",\"div\",null,{\"className\":\"px-5 py-3.5 border-b border-border bg-muted/30\",\"children\":[\"$\",\"p\",null,{\"className\":\"text-[10px] font-black uppercase tracking-widest text-muted-foreground\",\"children\":\"Recent Posts\"}]}],[\"$\",\"div\",null,{\"className\":\"divide-y divide-border\",\"children\":[[\"$\",\"$L21\",\"01KTDWWWBBY7GNVKY7SEV8HW2P\",{\"href\":\"/blogs/3-7v-lipo-battery-2000mah\",\"className\":\"flex items-center gap-3 px-4 py-3 hover:bg-muted/40 transition-colors group\",\"children\":[[\"$\",\"$L22\",null,{\"src\":\"https://electroglobal-products.s3.ap-south-1.amazonaws.com/blog-images/choosing-the-right-3-7-v-lipo-battery-2000mah-for-diy-electronics-project-13ef9216-841a-4ef9-9b39-8451189b2ec6.webp\",\"alt\":\"Choosing the Best 3.7 V LiPo Battery 2000mAh for Reliable DIY Electronics\",\"width\":48,\"height\":48,\"className\":\"rounded-xl object-cover shrink-0 border border-border\"}],[\"$\",\"div\",null,{\"className\":\"flex-1 min-w-0\",\"children\":[[\"$\",\"p\",null,{\"className\":\"text-xs font-bold line-clamp-2 leading-snug group-hover:text-primary transition-colors\",\"children\":\"Choosing the Best 3.7 V LiPo Battery 2000mAh for Reliable DIY Electronics\"}],[\"$\",\"p\",null,{\"className\":\"text-[10px] text-muted-foreground mt-0.5\",\"children\":\"6 June 2026\"}]]}]]}],[\"$\",\"$L21\",\"01KTDW5ZWD8T4WTGD876BGC1E4\",{\"href\":\"/blogs/3000mah-lipo-battery-guide\",\"className\":\"flex items-center gap-3 px-4 py-3 hover:bg-muted/40 transition-colors group\",\"children\":[[\"$\",\"$L22\",null,{\"src\":\"https://electroglobal-products.s3.ap-south-1.amazonaws.com/blog-images/raspberry-pi-pico-battery-guide-featuring-3000mah-lipo-battery-insights-444bd1c8-342c-4790-94ed-e028864b70f8.webp\",\"alt\":\"Raspberry Pi Pico Battery Guide Featuring 3000mAh LiPo Battery Insights\",\"width\":48,\"height\":48,\"className\":\"rounded-xl object-cover shrink-0 border border-border\"}],[\"$\",\"div\",null,{\"className\":\"flex-1 min-w-0\",\"children\":[[\"$\",\"p\",null,{\"className\":\"text-xs font-bold line-clamp-2 leading-snug group-hover:text-primary transition-colors\",\"children\":\"Raspberry Pi Pico Battery Guide Featuring 3000mAh LiPo Battery Insights\"}],[\"$\",\"p\",null,{\"className\":\"text-[10px] text-muted-foreground mt-0.5\",\"children\":\"5 June 2026\"}]]}]]}],[\"$\",\"$L21\",\"01KTDVJ71DYD2WD933G5K9DDD2\",{\"href\":\"/blogs/heating-3-7v-lipo-battery\",\"className\":\"flex items-center gap-3 px-4 py-3 hover:bg-muted/40 transition-colors group\",\"children\":[[\"$\",\"$L22\",null,{\"src\":\"https://electroglobal-products.s3.ap-south-1.amazonaws.com/blog-images/understanding-and-managing-heating-issues-in-3-7-v-lipo-battery-packs-8b3427bd-47a5-4c68-8f2c-5f7676caba79.webp\",\"alt\":\"Understanding and Managing Heating Issues in 3.7 V LiPo Battery Packs\",\"width\":48,\"height\":48,\"className\":\"rounded-xl object-cover shrink-0 border border-border\"}],[\"$\",\"div\",null,{\"className\":\"flex-1 min-w-0\",\"children\":[[\"$\",\"p\",null,{\"className\":\"text-xs font-bold line-clamp-2 leading-snug group-hover:text-primary transition-colors\",\"children\":\"Understanding and Managing Heating Issues in 3.7 V LiPo Battery Packs\"}],[\"$\",\"p\",null,{\"className\":\"text-[10px] text-muted-foreground mt-0.5\",\"children\":\"4 June 2026\"}]]}]]}],[\"$\",\"$L21\",\"01KT3JWWTKY2ZPGFQ22WPJNTMA\",{\"href\":\"/blogs/optimize-esp32-3000mah-lipo-409756\",\"className\":\"flex items-center gap-3 px-4 py-3 hover:bg-muted/40 transition-colors group\",\"children\":[[\"$\",\"$L22\",null,{\"src\":\"https://electroglobal-products.s3.ap-south-1.amazonaws.com/blog-images/practical-power-optimization-techniques-for-esp32-with-3000mah-lipo-battery-packs (1)-8e922b22-17d0-4942-ae0a-a5030763ed77.webp\",\"alt\":\"Optimize ESP32 Battery Life with a 3000mAh LiPo Battery\",\"width\":48,\"height\":48,\"className\":\"rounded-xl object-cover shrink-0 border border-border\"}],\"$L2d\"]}]]}]]}],\"$L2e\",\"$L2f\"]}]\n"])</script><script>self.__next_f.push([1,"2d:[\"$\",\"div\",null,{\"className\":\"flex-1 min-w-0\",\"children\":[[\"$\",\"p\",null,{\"className\":\"text-xs font-bold line-clamp-2 leading-snug group-hover:text-primary transition-colors\",\"children\":\"Optimize ESP32 Battery Life with a 3000mAh LiPo Battery\"}],[\"$\",\"p\",null,{\"className\":\"text-[10px] text-muted-foreground mt-0.5\",\"children\":\"2 June 2026\"}]]}]\n2e:[\"$\",\"div\",null,{\"className\":\"rounded-2xl border border-border bg-card overflow-hidden\",\"children\":[[\"$\",\"div\",null,{\"className\":\"px-5 py-3.5 border-b border-border bg-muted/30\",\"children\":[\"$\",\"p\",null,{\"className\":\"text-[10px] font-black uppercase tracking-widest text-muted-foreground\",\"children\":\"Categories\"}]}],[\"$\",\"div\",null,{\"className\":\"p-4\",\"children\":[\"$\",\"$L2a\",null,{\"tags\":\"$24:props:children:1:props:tags\"}]}]]}]\n2f:[\"$\",\"div\",null,{\"className\":\"rounded-2xl border border-primary/20 bg-primary/5 p-5\",\"children\":[[\"$\",\"div\",null,{\"className\":\"h-10 w-10 rounded-xl bg-primary/10 flex items-center justify-center mb-3\",\"children\":[\"$\",\"svg\",null,{\"className\":\"h-5 w-5 text-primary\",\"fill\":\"none\",\"viewBox\":\"0 0 24 24\",\"stroke\":\"currentColor\",\"children\":[\"$\",\"path\",null,{\"strokeLinecap\":\"round\",\"strokeLinejoin\":\"round\",\"strokeWidth\":2,\"d\":\"M3 8l7.89 5.26a2 2 0 002.22 0L21 8M5 19h14a2 2 0 002-2V7a2 2 0 00-2-2H5a2 2 0 00-2 2v10a2 2 0 002 2z\"}]}]}],[\"$\",\"p\",null,{\"className\":\"text-sm font-black text-foreground mb-1\",\"children\":\"Stay Updated\"}],[\"$\",\"p\",null,{\"className\":\"text-xs text-muted-foreground mb-4 leading-relaxed\",\"children\":\"Get the latest electronics guides \u0026 tutorials delivered to your inbox.\"}],[\"$\",\"$L21\",null,{\"href\":\"/blogs\",\"className\":\"block text-center w-full py-2 rounded-xl bg-primary text-primary-foreground text-xs font-bold hover:opacity-90 transition-opacity\",\"children\":\"Browse All Posts\"}]]}]\n"])</script><script>self.__next_f.push([1,"26:[\"$\",\"section\",null,{\"aria-label\":\"Related content\",\"className\":\"container mx-auto px-4 max-w-6xl py-6\",\"style\":{\"borderTop\":\"1px solid #c7d3dd\"},\"children\":[[\"$\",\"h2\",null,{\"className\":\"text-sm font-bold mb-4\",\"style\":{\"color\":\"#0a0a0a\"},\"children\":\"Related Content\"}],[\"$\",\"div\",null,{\"className\":\"mb-4\",\"children\":[[\"$\",\"h3\",null,{\"className\":\"text-xs font-semibold uppercase tracking-widest mb-2\",\"style\":{\"color\":\"#5b6979\"},\"children\":\"Related Products\"}],[\"$\",\"ul\",null,{\"className\":\"flex flex-wrap gap-2\",\"children\":[[\"$\",\"li\",\"product:prod_01KVQ0R1D6WMMP1Z3F2SE3NMMV\",{\"children\":[\"$\",\"a\",null,{\"href\":\"https://electroglobal.in/store/arduino-uno-r3-development-board\",\"className\":\"text-xs font-medium px-3 py-1 rounded-full transition-all duration-150 hover:bg-[#0a0a0a] hover:text-white hover:border-[#0a0a0a]\",\"style\":{\"backgroundColor\":\"#e8edf1\",\"color\":\"#5b6979\",\"border\":\"1px solid #c7d3dd\"},\"children\":\"Arduino Uno R3 Development Board: Arduino IDE Compatible, Arduino Board for Arduino Uno Projects\"}]}]]}]]}],false,[\"$\",\"div\",null,{\"className\":\"mb-4\",\"children\":[[\"$\",\"h3\",null,{\"className\":\"text-xs font-semibold uppercase tracking-widest mb-2\",\"style\":{\"color\":\"#5b6979\"},\"children\":\"From the Blog\"}],[\"$\",\"ul\",null,{\"className\":\"flex flex-wrap gap-2\",\"children\":[[\"$\",\"li\",\"blog:01KKBV5KXYW1VCF96S854VEHDS\",{\"children\":[\"$\",\"a\",null,{\"href\":\"https://electroglobal.in/blogs/5-shocking-facts-about-arduino-cost-value\",\"className\":\"text-xs font-medium px-3 py-1 rounded-full transition-all duration-150 hover:bg-[#0a0a0a] hover:text-white hover:border-[#0a0a0a]\",\"style\":{\"backgroundColor\":\"#e8edf1\",\"color\":\"#5b6979\",\"border\":\"1px solid #c7d3dd\"},\"children\":\"Arduino Bluetooth-Controlled Robotic Arm Car for Pick and Place Tasks\"}]}],[\"$\",\"li\",\"blog:01KKBV5N5FJ1TPYJTDJ3YSR2MD\",{\"children\":[\"$\",\"a\",null,{\"href\":\"https://electroglobal.in/blogs/guide-arduino-and-esp8266-iot-projects\",\"className\":\"text-xs font-medium px-3 py-1 rounded-full transition-all duration-150 hover:bg-[#0a0a0a] hover:text-white hover:border-[#0a0a0a]\",\"style\":{\"backgroundColor\":\"#e8edf1\",\"color\":\"#5b6979\",\"border\":\"1px solid #c7d3dd\"},\"children\":\"Voice Connection based Security system with ESP8266 and Arduino for IoT in Home Automation\"}]}],[\"$\",\"li\",\"blog:01KKBV5PVQ52QZYX97XWGYFZFW\",{\"children\":[\"$\",\"a\",null,{\"href\":\"https://electroglobal.in/blogs/building-a-wireless-bluetooth-controlled-robot-car-with-arduino-a-complete-instruction\",\"className\":\"text-xs font-medium px-3 py-1 rounded-full transition-all duration-150 hover:bg-[#0a0a0a] hover:text-white hover:border-[#0a0a0a]\",\"style\":{\"backgroundColor\":\"#e8edf1\",\"color\":\"#5b6979\",\"border\":\"1px solid #c7d3dd\"},\"children\":\"Building a Wireless Bluetooth Controlled Robot Car with Arduino: A Complete Instruction\"}]}],[\"$\",\"li\",\"blog:01KKBV5BPRQ2K8S1FWRXMT5FDT\",{\"children\":[\"$\",\"a\",null,{\"href\":\"https://electroglobal.in/blogs/obstacle-avoiding-robo-kit\",\"className\":\"text-xs font-medium px-3 py-1 rounded-full transition-all duration-150 hover:bg-[#0a0a0a] hover:text-white hover:border-[#0a0a0a]\",\"style\":{\"backgroundColor\":\"#e8edf1\",\"color\":\"#5b6979\",\"border\":\"1px solid #c7d3dd\"},\"children\":\"Obstacle Avoiding Robo Kit - ElectroGlobal\"}]}],[\"$\",\"li\",\"blog:01KMF2743N9F3C116PYJGFAY9Z\",{\"children\":[\"$\",\"a\",null,{\"href\":\"https://electroglobal.in/blogs/obstacle-avoiding-robo-kit\",\"className\":\"text-xs font-medium px-3 py-1 rounded-full transition-all duration-150 hover:bg-[#0a0a0a] hover:text-white hover:border-[#0a0a0a]\",\"style\":{\"backgroundColor\":\"#e8edf1\",\"color\":\"#5b6979\",\"border\":\"1px solid #c7d3dd\"},\"children\":\"Obstacle Avoiding Robo Kit - ElectroGlobal\"}]}]]}]]}]]}]\n"])</script></body></html>